你或許看過四不像,但是你聽過四很像嗎?:NgRx
![]()
前言
在 別太在意包裝上的照片與實物之間的差異:RxJS 我們透過原始碼可以了解 RxJS 對於監控對象提供了3種狀態(next、error、complete)的通知功能。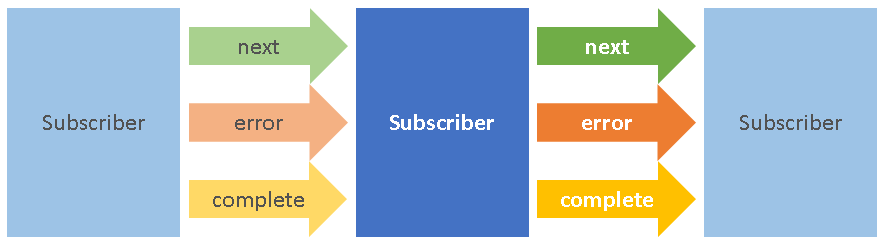
我們可以透過時做 Observer 介面來決定3種狀態發生時要做什麼處理,而 Subscriber 除了可以決定要做什麼事情之外,還可以決定要如何通知別人,所以如果我們不需要提供通知功能只要實作 Observer 介面即可。
那 NgRx 是什麼東西?在做什麼事?上網搜尋得到的答案大概就是 Angular 版的 Redux Pattern。NgRx = Redux + RxJS + Angular
同時應該也會看到許多類似下圖的圖解。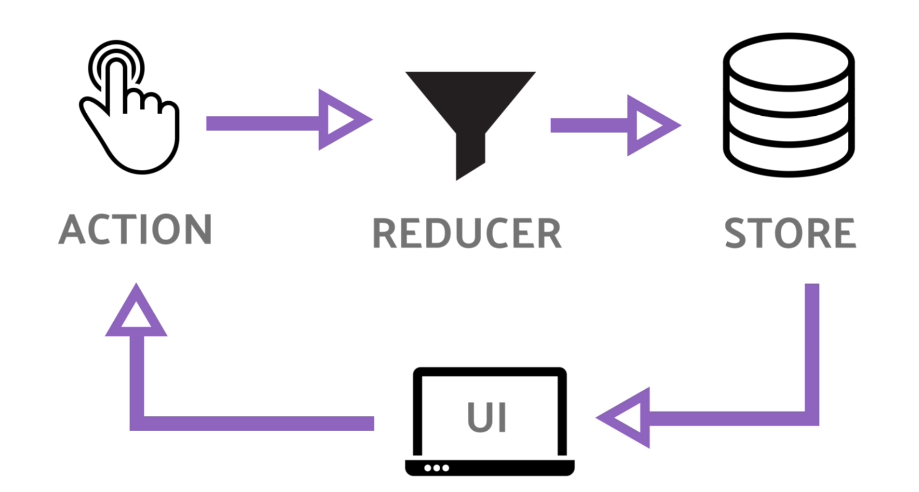
Store
從 NgRx 官方頁面 可以看到需多功能,其中 Store 大概是最常用也是最實用的功能,因此本篇就以略懂 RxJS 的角度來看看 NgRx 的 Store 在做什麼。
安裝
我們開啟 @ngrx/store 說明頁面,來看看它的教學,首先就是安裝套件,我們可以在專案目錄下透過下列指令來安裝:npm install @ngrx/store
建立 Reducer
接著建立一個 Reducer 函式-counterReducer,由範例可以大概了解它會傳入2個參數 state、action,並依 action.type 回傳處理後的 state 值。
1 | import { Action } from '@ngrx/store'; |
註冊 StoreModule
接著我們可以看到它在 AppModule 內透過 StoreModule.forRoot 將 StoreModule 註冊成 SharedModule,並同時帶入 counterReducer。
StoreModule 提供了
forRoot、forFeature2種方法。
參考資料:使用 forRoot() 幫助 SharedModule 提供單一實例服務 - Poy Chang
1 | import { NgModule } from '@angular/core'; |
使用
最後我們從使用範例上可以看到它做了幾件事情:
透過 DI 注入 一個具有 AppState 物件的 Store。
在 button 的 click 事件內透過
dispatch方法傳送具有type屬性的物件,
可以看到這些 type 的值剛好對應到 counterReducer 內的 action.type,
所以我們應該是傳送一個 Action 物件。宣告一個 Observable
型別的屬性 count$ 來接收 store.pipe(select('count')),
因為使用了 RxJS 的pipe方法,所以select應該是一種 Operator,
最後再將 count$ 綁定到樣板上並透過 Angular 的 AsyncPipe 來抓取資料。
1 | import { Component } from '@angular/core'; |
流程
我們重新在整理一下,我們實作了一個 counterReducer 並將它註冊到 NgRx 的 Store 內,接著我們會在 Component 上來呼叫它。
我們在點擊 Increment 按鈕時透過 Store 的 dispatch 方法傳送一個 type: INCREMENT 的 Action 物件。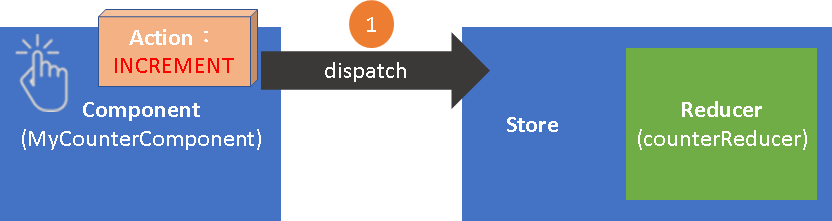
從 NgRx 原始碼可以得知 Action 是一個只有
type屬性的介面。
1 | export interface Action { |
Store 內部會自行找到我們所建立的 counterReducer 並將 Action 值傳遞給它。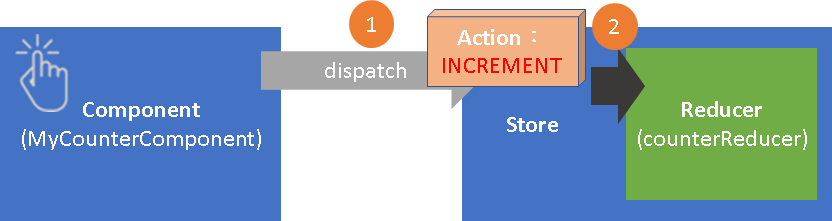
接著執行 counterReducer 函式,依照所傳入的 action.type 做處理並回傳新的 State。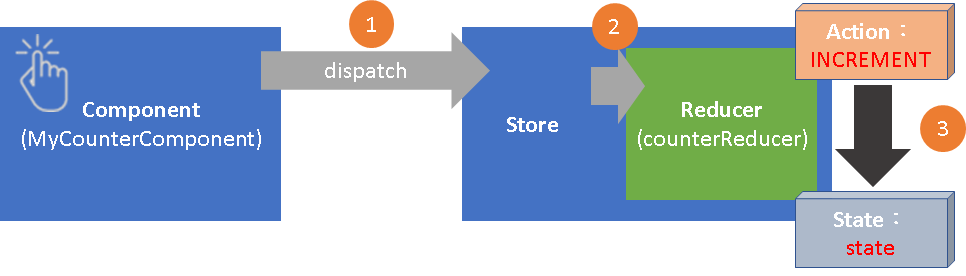
Store 會接收到 counterReducer 函式所回傳的 State。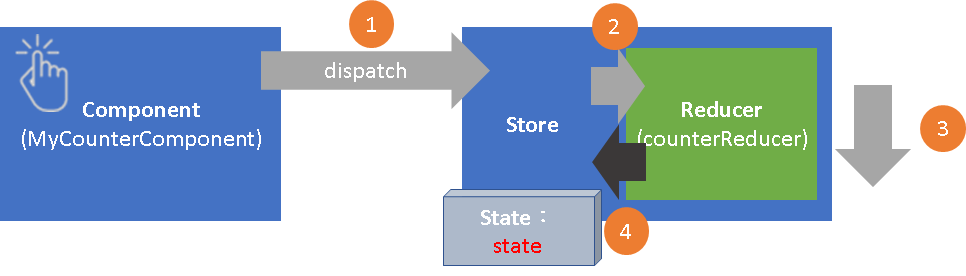
在 Component 上 透過 Store.select 方法來取得 State 目前所需要的資料。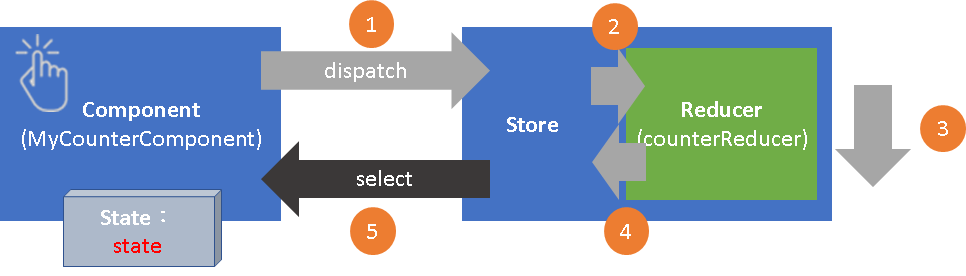
原始碼
我們可以從 GitHub 網站下載 NgRx 原始碼,查看 \modules\store\src\store.ts 可以看到 NgRx 的 Store 類別實作了 RxJS 的 Observer 介面並繼承 Observable 類別,而 ActionsSubject 底層就是透過 BehaviorSubject 來包裝 Action,最特別的就是範例所使用的 dispatch 方法其實就是呼叫 next 方法。
Store 對應 Observer 介面的3個方法(next、error、complete)也只觸發 BehaviorSubject 所對應的方法,本質上比較像 Subscriber,因為它並沒有決定要做什麼事。
1 | () |
select 就是 RxJS Operator
接著觀察 select 方法相關程式碼,如果有研究過 RxJS Operator 的原始碼應該可以發現 select 就是 NgRx 自己實作的 RxJS Operator,我們可以看到最關鍵的 selectOperator 函式:
- 當傳入的參數是
string時它會使用 RxJS 的pluckOperator。 - 當傳入的參數是
function時它會使用 RxJS 的mapOperator。 - 最後一律透過 RxJS 的
distinctUntilChanged再篩選一次,也就是當dispatch(next) 傳入的值與之前一樣時就不會回應。
1 | () |
腦補時間
雖然還沒仔細研究底層運作,但是就目前認知,大概可以推想出可能的運作模式,NgRx 會透過 RxJS 的 Subject 來監看 action 與 state,我們可以透過 dispatch 方法來觸發 Subject(負責監看 Action) 的 next 方法,Store 會透過訂閱,再發生 next 時幫我們去呼叫我們所撰寫的 Reducer 方法,接著將回傳值透過 next 塞入 Subject(負責監看 State)內,最後 NgRx 再對外提供一個已經訂閱 Subject(負責監看 State) 的 Select Operator,而我們則透過訂閱這個 Subject 來取得對應 Action 的資料。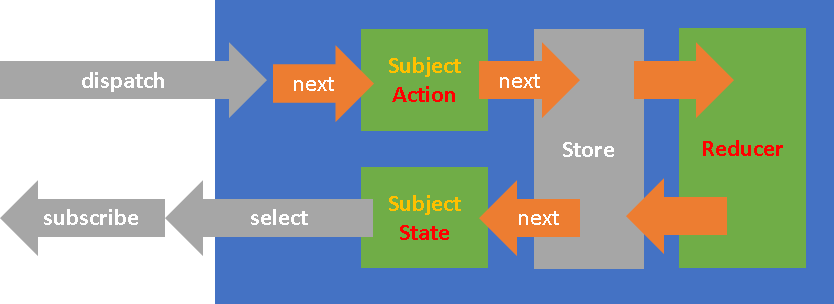
- Action 就像是 RxJS 的通知,只是 RxJS 只有3種狀態
next、error、complete,而 NgRx 可以讓我們自訂多種狀態,Action 應該是取自 UML:活動圖(activity diagram),代表一個執行動作,其實我們也可以當成是”事件”或是”操作狀態”。 - State 雖然說是狀態,但是筆者認為比較像資料結構,我們將所有 Action 發生時所會用到的資料都訂定在 State 內,
- Reducer 就像是 RxJS 的 Subscriber,決定當狀態改變時要做什麼事情,只是它也像是一個轉換器,負責將 Action 轉換成對應的 State 資料。
- Reducer 傳入的 state 參數應該是指 Action 發生之前的資料狀態,而我們最後會在回傳新的 state 值,雖然沒有硬性規定,但是理論上 Reducer 應當回傳相同結構的 state 類別,因此除非真的會回傳不同類別,否則最好 利用 TypeScript 強制訂定回傳結構。
- Action 至少要包含
type屬性,代表我們還可以帶入其他資料,所以 Reducer 不是只能單純判斷type屬性,使用type屬性主要是配合 Redux 風格。 - select 就是 RxJS Operator,它會回傳的就是透過 Observable 打包的 State 資料,所以我們可以直接在樣板上透過
async來訂閱資料,或是我們自己訂閱(subscribe),當然我們還可以先透過 RxJS Operator 再加工處理。 - Store 繼承自
Observable<T>,這個T只的就是 state 類別,所以如果 select 不符合你的需求,那就直接訂閱 Store 物件,自己處理。
四很像
看過 NgRx Store 的程式碼後聯想起漫畫 HUNTER×HUNTER 內雲古對小傑說的一句話。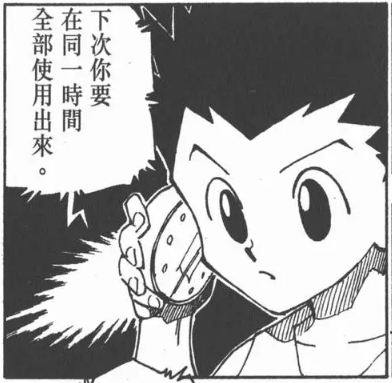
將所有學到的技能一次同時展現就會變成很厲害的絕招,沒錯,Store 可以說是將 RxJS 的分散的功能都整合在一起,我們可以將 Component 內的操作都建立對應的 Action,並將相關邏輯處理都包再 Reducer 內,這樣整個 class 就會更加乾淨。
還有別忘了 Store 同時也是個 SharedModule,只要畫面上所有有訂閱的 Component 都可以即時收到通知,例如將登入、登出封裝到 Store,我們在登入成功後將使用者資訊儲存到 State 內,這樣有訂閱的 Component 就可以檢查權限是否足夠,相對的,收到登出通知時 Component 可以決定是否關閉畫面。