Angular 元件
元件 (Component)
在 Angular 基本運作流程 我們概略說明了 Angular 的元件(Component)主要是透過將類別(class)加上 @Component 裝飾器的宣告來組成。
從官方文件可以看到 @Component 還包含其他屬性,例如:動畫。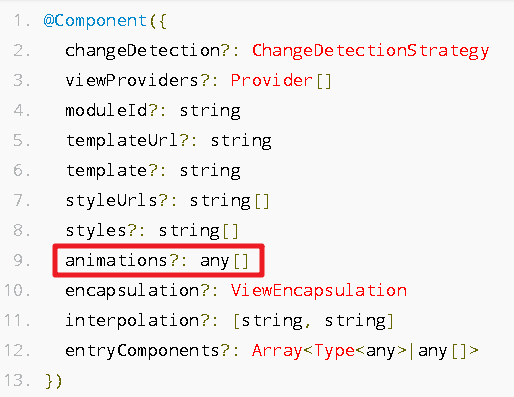
如何新增元件
要建立新的元件可以手動建立相關檔案並修改相關設定,但是另一個更好的方法就是透過 CLI 幫我們產生相關檔案,語法如下:ng generate component [name]
generate:可以縮寫成gcomponent:可以縮寫成c
練習新增一個 page1 component
透過指令 ng g c page1 可以發現 CLI 幫我們建議一個與元件同名(page1)的資料夾,並在資料夾內產生4個檔案,最後再更新 AppModule。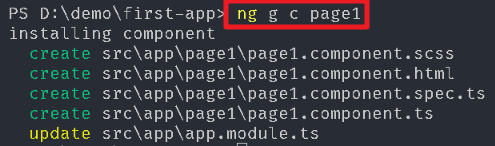
src\app\page1\page1.component.ts:CLI會建立一個已宣告@Component裝飾器的類別(Page1Component),此類別也是主要程式撰寫的地方。
1 | import { Component, OnInit } from '@angular/core'; |
src\app\page1\page1.component.html:Page1Component 所對應的樣板。
1 | <p> |
src\app\page1\page1.component.scss::Page1Component 樣板所對應的樣式,目前空白。
1 |
src\app\page1\page1.component.spec.ts:Page1Component 的單元測試檔。
1 | import { async, ComponentFixture, TestBed } from '@angular/core/testing'; |
若不想要建立資料夾,可以加上
--flat參數。
若是不想建立 style 檔,可以加上-is參數。
若是不想建立 template 檔,可以加上-it參數。
相關參數請參考 GitHub。
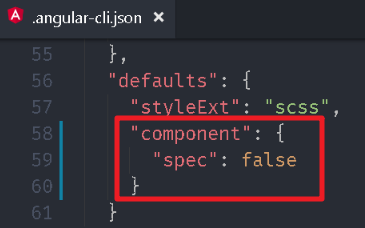
若是不想建立 unit testing 檔,可以在.angular-cli.json內的 defaults 區段加上 component 參數,並給予"spec": false的屬性。
開啟 src\app\app.module.ts 可以發現 CLI 自動幫我們將 Page1Component 註冊到 AppModule 內。
1 | import { BrowserModule } from '@angular/platform-browser'; |
Component 無法獨立存在,必須依附在 NgModule 內,依附方式就是將 Component 註冊到 NgModule 的 declarations 屬性內。
練習新增一個最陽春的 page2 component
透過指令 ng g c page2 --flat -is -it,CLI 並不會建立元件的資料夾,只幫我們建立 page2.component.ts 檔,並將 Page2Component 註冊到 AppModule 內。
因為 .angular-cli.json 也取消 component 的單元測試,所以 page2.component.spec.ts 也不會被建立。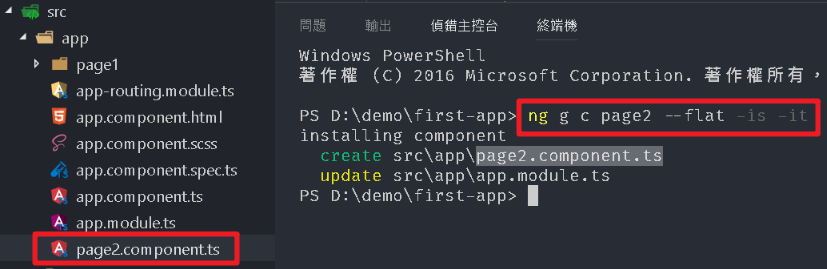
src\app\page2.component.ts 內容如下:
1 | import { Component, OnInit } from '@angular/core'; |
src\app\app.module.ts 變動如下:
1 | import { BrowserModule } from '@angular/platform-browser'; |
比較特別的是 @Component 內 templateUrl 被 template 替代,styleUrls 被 styles 替代,我們可以把樣板內容直接填寫在 template 屬性,把樣式內容填寫在 styles 屬性。
也就是說當我們希望樣板及樣式是獨立檔案時可使用 templateUrl 與 styleUrls 來連結檔案,如果是希望能夠合併成一個檔案時則改用 template 與 styles 屬性。
模板源文本使用 (``) (重音符號,又稱反引號) 圍著,而非字串常用的、英文中的單引號或雙引號。模板源文本中可以包涵由錢字符($)與大括號({ })所構成的佔位符(即:${expression}),佔位符與其附近的文字會一併傳給函數,預設函數將把這些部分組合成一個單一的字串。如果模板源文本由一個表達式開頭(即下方範例中使用的 myTag),我們稱之為「帶標籤模板源文本」(tagged template literal)。在這種情況下,該標籤表達式(通常是函數)會在模板源文本處理後被呼叫,因此我們可以在輸出文字之前,做進一步的操作。若要在模板源文本中使用反引號,要使用轉義字元的形式,在前面加上反斜線「\」。
(半)純手工打造 page3 component
點選 app 資料夾再點選新增檔案按鈕(或者再 app 資料夾按滑鼠右鍵選擇新增檔案),將檔案命名為 page3.component.ts。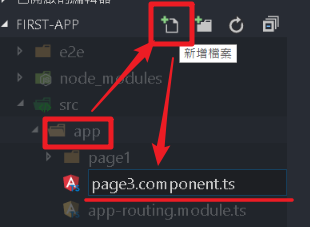
開啟 page3.component.ts,輸入 a- 則會列出 Angular v4 TypeScript Snippets 所提供的代碼片段,選擇 a-component 即可產生基本的程式框架。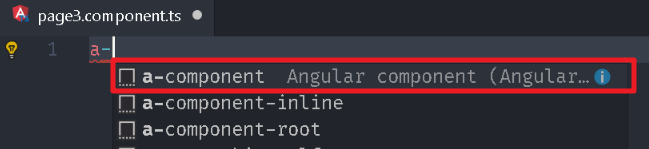
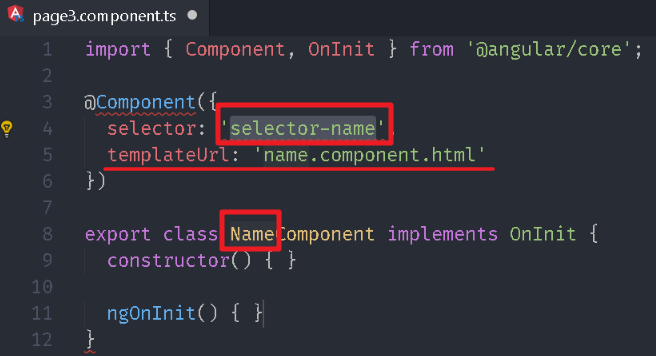
最後再手動修該部分代碼以及將 Page3Component 註冊到 AppModule 即可完成。
1 | import { Component, OnInit } from '@angular/core'; |
1 | import { BrowserModule } from '@angular/platform-browser'; |
Angular Extension Pack 擴充功能已經包含 Angular v4 TypeScript Snippets,所以可以直接使用代碼片段。
套用 Component
開啟 app.component.html,並將 Page1Component、Page2Component、Page3Component 內 selector 所設定的 tag 加入至 app.component.html。
1 | <app-page1></app-page1> |
執行 ng serve,並透過瀏覽器察看結果。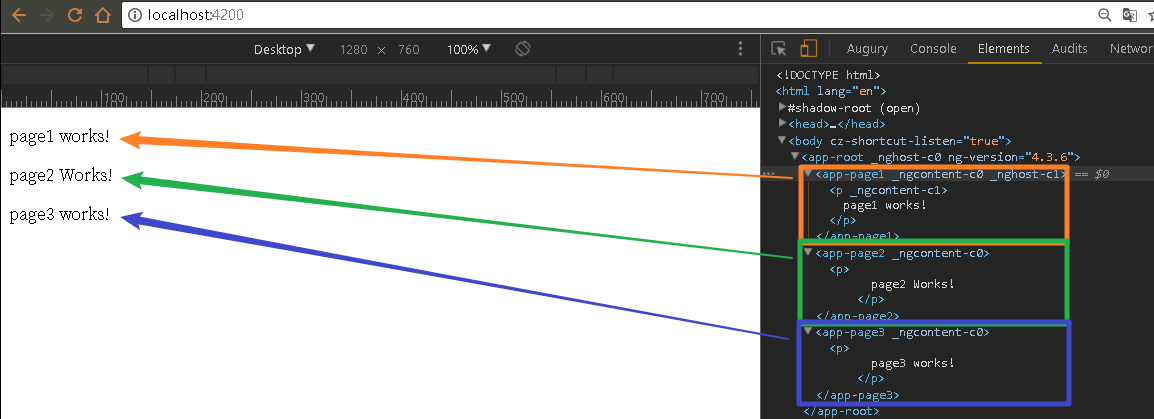
比較上述幾個方法後,透過 CLI 指令應該是最方便的,也可讓命名規則符合 Angular 所建議的模式。