路由 (Routing) 在 Angular 元件 最後面我們練習了直接透過 tag 來嵌入 Component,但是這只是在頁面一開始呈現的效果,而正常情況下還需要依照使用者的操作適當的改變內容,例如切換不同功能時需要整個頁面替換掉,做查詢時可能要在介面上的某個區塊將結果顯示出來。部分換區塊 ,說是部分換區塊 是因為正常情況下,Angular 的根元件 (起始模組 內所指定的起始元件 )在一開始載入後便無法被抽換掉,我們只能替換根元件 內的內容。
在 建立 Angular 專案 我們在建立專案時透過指令 ng new first-app --routing --style scss 來建立專案,其中帶了一個參數 --routing,此參數讓 CLI 在建立專案同時幫我們新增一個具有路由功能的模組― AppRoutingModule ,並將該模組註冊到 AppModule 內。scr\app\app-routing.module.ts 可以發現裡面宣告一個 routes 的陣列變數讓我們可以加入多個路由規則,最後 RouterModule.forRoot(routes) 則是將此路由變數宣告為根路由。
app-routing.module.ts 1 2 3 4 5 6 7 8 9 10 11 12 13 14 15 16 import { NgModule } from '@angular/core' ;import { Routes, RouterModule } from '@angular/router' ;const routes: Routes = [ { path : '' , children : [] } ]; @NgModule ({ imports : [RouterModule.forRoot(routes)], exports : [RouterModule] }) export class AppRoutingModule
之前將 Component 註冊到模組時是加在 NgModule 的 declarations 屬性內,但是由程式碼可知 NgModule 要註冊到另一個 NgModule 時,則必須加到 imports 屬性內。
app.module.ts 1 2 3 4 5 6 7 8 9 10 11 12 13 14 15 16 17 18 19 20 21 22 23 24 25 import { BrowserModule } from '@angular/platform-browser' ;import { NgModule } from '@angular/core' ;import { AppRoutingModule } from './app-routing.module' ;import { AppComponent } from './app.component' ;import { Page1Component } from './page1/page1.component' ;import { Page2Component } from './page2.component' ;import { Page3Component } from './page3.component' ;@NgModule ({ declarations : [ AppComponent, Page1Component, Page2Component, Page3Component ], imports : [ BrowserModule, AppRoutingModule ], providers : [], bootstrap : [AppComponent] }) export class AppModule
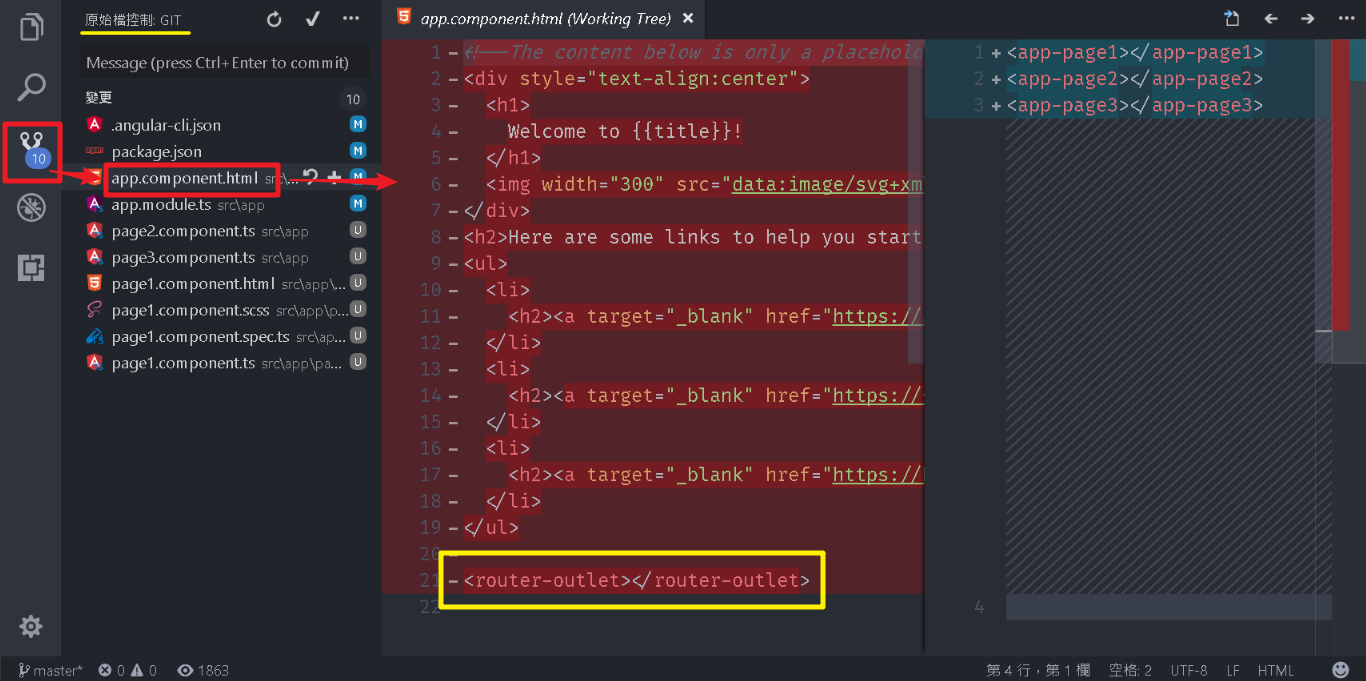
路由插座 (router-outlet) 大家之前若有注意到 CLI 所建立的專案內的 app.component.html,網頁內的最後一行是一個奇怪的 tag- <router-outlet></router-outlet>,如果大家跟我一樣健忘,但是電腦內有剛好有安裝 git ,那麼就可以直接利用 VS Code 的原始檔控制 來回溯內容。
git 工具可以至 https://git-scm.com/ 網站下載安裝。
點選原始檔控制 然後選擇 app.component.html 及可看到目前內容與先前的內容。src\app\app.component.html)
app.component.html 1 2 3 4 5 6 7 8 9 10 11 12 13 14 15 16 17 18 19 20 21 22 <div style ="text-align:center" > <h1 > Welcome to { {title} }! </h1 > <img width ="300" src ="data:image/svg+xml;base64,PD94bWwgdmVyc2lvbj0iMS4wIiBlbmNvZGluZz0idXRmLTgiPz4NCjwhLS0gR2VuZXJhdG9yOiBBZG9iZSBJbGx1c3RyYXRvciAxOS4xLjAsIFNWRyBFeHBvcnQgUGx1Zy1JbiAuIFNWRyBWZXJzaW9uOiA2LjAwIEJ1aWxkIDApICAtLT4NCjxzdmcgdmVyc2lvbj0iMS4xIiBpZD0iTGF5ZXJfMSIgeG1sbnM9Imh0dHA6Ly93d3cudzMub3JnLzIwMDAvc3ZnIiB4bWxuczp4bGluaz0iaHR0cDovL3d3dy53My5vcmcvMTk5OS94bGluayIgeD0iMHB4IiB5PSIwcHgiDQoJIHZpZXdCb3g9IjAgMCAyNTAgMjUwIiBzdHlsZT0iZW5hYmxlLWJhY2tncm91bmQ6bmV3IDAgMCAyNTAgMjUwOyIgeG1sOnNwYWNlPSJwcmVzZXJ2ZSI+DQo8c3R5bGUgdHlwZT0idGV4dC9jc3MiPg0KCS5zdDB7ZmlsbDojREQwMDMxO30NCgkuc3Qxe2ZpbGw6I0MzMDAyRjt9DQoJLnN0MntmaWxsOiNGRkZGRkY7fQ0KPC9zdHlsZT4NCjxnPg0KCTxwb2x5Z29uIGNsYXNzPSJzdDAiIHBvaW50cz0iMTI1LDMwIDEyNSwzMCAxMjUsMzAgMzEuOSw2My4yIDQ2LjEsMTg2LjMgMTI1LDIzMCAxMjUsMjMwIDEyNSwyMzAgMjAzLjksMTg2LjMgMjE4LjEsNjMuMiAJIi8+DQoJPHBvbHlnb24gY2xhc3M9InN0MSIgcG9pbnRzPSIxMjUsMzAgMTI1LDUyLjIgMTI1LDUyLjEgMTI1LDE1My40IDEyNSwxNTMuNCAxMjUsMjMwIDEyNSwyMzAgMjAzLjksMTg2LjMgMjE4LjEsNjMuMiAxMjUsMzAgCSIvPg0KCTxwYXRoIGNsYXNzPSJzdDIiIGQ9Ik0xMjUsNTIuMUw2Ni44LDE4Mi42aDBoMjEuN2gwbDExLjctMjkuMmg0OS40bDExLjcsMjkuMmgwaDIxLjdoMEwxMjUsNTIuMUwxMjUsNTIuMUwxMjUsNTIuMUwxMjUsNTIuMQ0KCQlMMTI1LDUyLjF6IE0xNDIsMTM1LjRIMTA4bDE3LTQwLjlMMTQyLDEzNS40eiIvPg0KPC9nPg0KPC9zdmc+DQo=" > </div > <h2 > Here are some links to help you start: </h2 > <ul > <li > <h2 > <a target ="_blank" href ="https://angular.io/tutorial" > Tour of Heroes</a > </h2 > </li > <li > <h2 > <a target ="_blank" href ="https://github.com/angular/angular-cli/wiki" > CLI Documentation</a > </h2 > </li > <li > <h2 > <a target ="_blank" href ="https://blog.angular.io//" > Angular blog</a > </h2 > </li > </ul > <router-outlet > </router-outlet >
我們可以把 router-outle 看成 Component 的 tag,因為 Angular 的路由機制運作結果會如同 Component 的 tag,會以這個 tag 當作標記去插入指定的 Component。
練習編寫路由規則 移除 app.component.html 所有內容,只添加一個 <router-outlet></router-outlet>,這樣執行起來畫面會完全空白,如果畫面上出現東西就表示路由機制運作成功。
app.component.html 1 2 <router-outlet > </router-outlet >
開啟 app-routing.module.ts ,加入3個路由規則 分別對應到 Page1Component、Page2Component、Page3Component。
path:設定導覽的相對路徑component:設定要載入的 Component
當導覽路徑變化時 Angular Router 會將導覽路徑拿來跟路由規則逐一比對,如果路徑與 path 條件符合就會執行該路由條件,因為目前我們設定了 component 屬性,所以符合條件時就會將 component 屬性所指定的 Component 插入目前 Component 的 router-outlet tag 內。
app-routing.module.ts 1 2 3 4 5 6 7 8 9 10 11 12 13 14 15 16 17 18 19 import { NgModule } from '@angular/core' ;import { Routes, RouterModule } from '@angular/router' ;import { Page1Component } from './page1/page1.component' ;import { Page2Component } from './page2.component' ;import { Page3Component } from './page3.component' ;const routes: Routes = [ { path : '' , children : [] }, { path : 'p1' , component : Page1Component }, { path : 'p2' , component : Page2Component }, { path : 'p3' , component : Page3Component } ]; @NgModule ({ imports : [RouterModule.forRoot(routes)], exports : [RouterModule] }) export class AppRoutingModule
路由規則比對時,一旦比對到符合條件的規則後續就不會再做比對,所以路由規則是有順序性 。
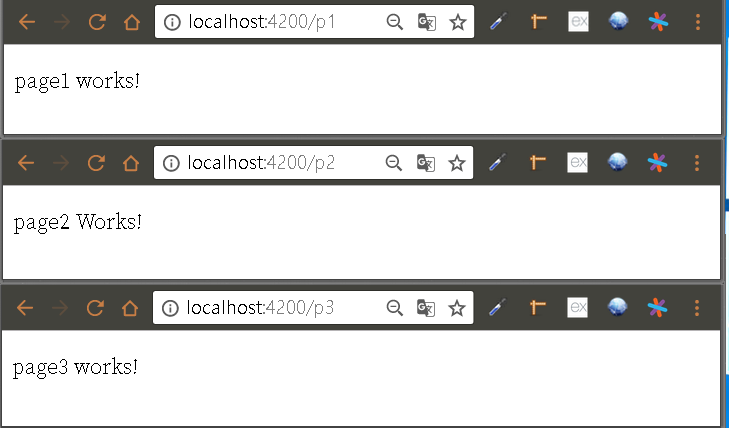
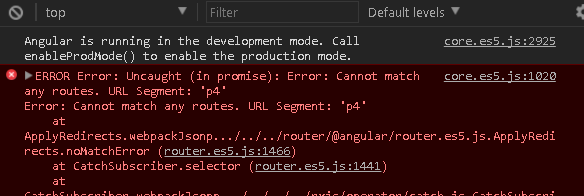
透過 ng serve 啟動,並分別連結至 http://localhost:4200/p1 http://localhost:4200/p2 http://localhost:4200/p3 http://localhost:4200/p4 http://localhost:4200/**,可是開啟瀏覽器開發者工具就會發現系統發出錯誤的訊息。
萬用路由 (**) Angular Router 提供一個萬用路由規則,當 path 屬性設定為 '**' 時表示條件為任意值,路由比對到這一個規則時一定會符合,所以設置在此規則後面的路由規則基本上是無效的,因為任何導覽路徑到了萬用路由就會被攔截調,所以正常會將萬用路由放置在路由規則的最後面 。
練習加入萬用路由 嘗試加入一個萬用路由,並改用 redirectTo 屬性, 將其設定為 ‘p1’。
redirectTo:表示當路由規則符合時會重新導覽到 redirectTo 所指定的路由路徑。
app-routing.module.ts 1 2 3 4 5 6 7 8 9 10 11 12 13 14 15 16 17 18 19 20 import { NgModule } from '@angular/core' ;import { Routes, RouterModule } from '@angular/router' ;import { Page1Component } from './page1/page1.component' ;import { Page2Component } from './page2.component' ;import { Page3Component } from './page3.component' ;const routes: Routes = [ { path : '' , children : [] }, { path : 'p1' , component : Page1Component }, { path : 'p2' , component : Page2Component }, { path : 'p3' , component : Page3Component }, { path : '**' , redirectTo : '' } ]; @NgModule ({ imports : [RouterModule.forRoot(routes)], exports : [RouterModule] }) export class AppRoutingModule
開啟瀏覽器在 http://localhost:4200/ 網址後面輸入任何非 p1、p2、p3,例如:http://localhost:4200/p4、http://localhost:4200/abc,會發現不論輸入任何值都會被重新導引到首頁(http://localhost:4200/),從瀏覽器開發者工具並不會看到任何錯誤訊息。
導覽至首頁 :此種情境適合在發生錯誤時使用者可以捨棄目前資訊,大部分來說這種非預期狀況是一般使用者無法排除的,因此導引至首頁可以讓使用者繼續操作,在 PWA(Progressive Web App) 網站應該是不錯的選擇。
Page Not Found :目前網站比較普遍的作法是建立一個 HTTP 404 頁面,對於比較需要立即修正的網站會比較適合,除了可以藉由 404 頁面蒐集當時狀態讓後續可以分析了解原因,這種中斷式頁面也較容易讓使用者立即反應回饋給維護人員。
練習製作 HTTP 404 頁面 透過指令 ng g c page404 建立一個,並修改 src\app\page404\page404.component.html 內容如下:
page404.component.html 1 2 3 4 <p > 404 Page Not Found </p >
修改 app-routing.module.ts 將萬用路由指向 Page404Component 。
app-routing.module.ts 1 2 3 4 5 6 7 8 9 10 11 12 13 14 15 16 17 18 19 20 21 22 import { NgModule } from '@angular/core' ;import { Routes, RouterModule } from '@angular/router' ;import { Page1Component } from './page1/page1.component' ;import { Page2Component } from './page2.component' ;import { Page3Component } from './page3.component' ;import { Page404Component } from './page404/page404.component' ;const routes: Routes = [ { path : '' , children : [] }, { path : 'p1' , component : Page1Component }, { path : 'p2' , component : Page2Component }, { path : 'p3' , component : Page3Component }, { path : '**' , component : Page404Component } ]; @NgModule ({ imports : [RouterModule.forRoot(routes)], exports : [RouterModule] }) export class AppRoutingModule
重新瀏覽任意不存在的路徑,如 http://localhost:4200/abc ,發現會一律顯示 Page404Component 的內容,但是導覽路徑不會改變。
app-routing.module.ts 1 2 3 4 5 6 7 8 9 10 11 12 13 14 15 16 17 18 19 20 21 22 23 24 import { NgModule } from '@angular/core' ;import { Routes, RouterModule } from '@angular/router' ;import { Page1Component } from './page1/page1.component' ;import { Page2Component } from './page2.component' ;import { Page3Component } from './page3.component' ;import { Page404Component } from './page404/page404.component' ;const routes: Routes = [ { path : '' , children : [] }, { path : 'p1' , component : Page1Component }, { path : 'p2' , component : Page2Component }, { path : 'p3' , component : Page3Component }, { path : '404' , component : Page404Component }, { path : '**' , redirectTo : '404' } ]; @NgModule ({ imports : [RouterModule.forRoot(routes)], exports : [RouterModule] }) export class AppRoutingModule
任何錯誤路徑都會被重新導覽到http://localhost:4200/404。
我們可以發現路由規則其實都是在比較相對路徑,我們在 path 並不會輸入完整路徑,Angular 又要如何知道應用程式的根路徑?<base href="/">,Angular Router 便是透過 base 這個 tag 來依序組合導覽路徑。
[**first-app_2017-08-30.zip**](/uploads/first-app_2017-08-30.zip)