延遲載入 (Lazy loading)
一般來說我們會將 JavaScript 直接撰寫在網頁內或是另外儲存成 js 檔再透過連結方式引用,但是隨著功能的增加檔案也會逐漸變大,因而導致使用者需要等待載入的時間也逐漸變長。
延遲載入 便是透過將 JavaScript 切割成多個檔案再逐一下載方式來縮短等待時間,看似簡單但是實作上卻很有難度,若單存只是將 JavaScript 切割成數個檔案然後都在主頁面連結,這樣其實總檔案大小並沒有改變,我們需要的應該是在下載完前面的 js 檔後網頁畫面應該就要呈現,而且使用者也可以開始操作,後續 js 檔下在後再動態載入目前的網頁程式內,因此出現一些問題需要克服:
如何切割:如果目前執行的 JavaScript 需要用到的方法或是參數還沒載入進來網頁可能就會當掉。
下載時機:是要一個接著一個的自動下載,還是等到需要用到時再下載。
動態載入:當 js 檔下載完成時目前的狀態可能因為使用者的操作而跟初始狀態不同了,這時該如何匯入。
在 Angular 模組化 我們發現 元件(Component) 可以很容易的移動到任意的 模組(NgModule) 內,不論是一開始的先規劃好或是事後的調整,其實沒有很困難,因此如果我們可以以 模組 當作切割單位,每個模組可以單獨為一個檔案,當使用者有需要用到該功能時再下載,這應該對開發人員來說應該會是很容易規劃的 延遲載入 方式,接下來我們就來看看如何利用 Angular 來實作 延遲載入 。
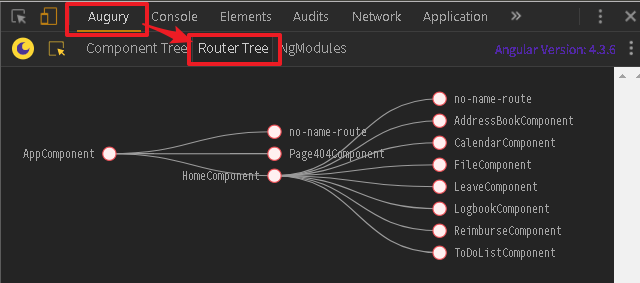
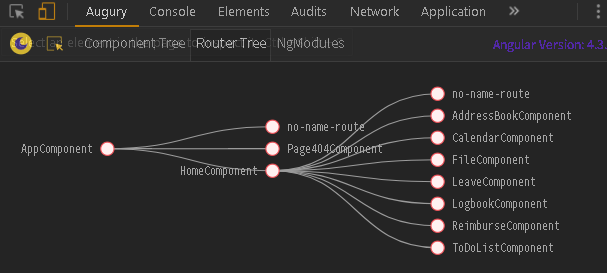
利用 Chrome 瀏覽器安裝 Augury 擴充功能。

執行專案,並透過 Chrome 的開發者工具查看,可以發現 Augury 下面的 RouterTree 完整的呈現專案的路由樹狀圖。
建立 employee 的路由模組
比較一下自己手動建立的路由規則的定義檔(src\app\employee\employee.routing.ts)與透過 --routing 參數建立的路由模組(src\app\home\home-routing.module.ts),可以發現最大差別就是 --routing 參數所建立的檔案會將路由規則再包覆到一個模組內。
employee.routing.ts1
2
3
4
5
6
7
8
9
10
11
12
13
14
15
16
17
18
19
20
21
22
| import { Routes } from '@angular/router';
import { AddressBookComponent } from './address-book/address-book.component';
import { CalendarComponent } from './calendar/calendar.component';
import { FileComponent } from './file/file.component';
import { LeaveComponent } from './leave/leave.component';
import { LogbookComponent } from './logbook/logbook.component';
import { ReimburseComponent } from './reimburse/reimburse.component';
import { ToDoListComponent } from './to-do-list/to-do-list.component';
const routes: Routes = [
{ path: '', redirectTo: 'to-do-list', pathMatch: 'full' },
{ path: 'address-book', component: AddressBookComponent },
{ path: 'calendar', component: CalendarComponent },
{ path: 'file', component: FileComponent },
{ path: 'leave', component: LeaveComponent },
{ path: 'logbook', component: LogbookComponent },
{ path: 'reimburse', component: ReimburseComponent },
{ path: 'to-do-list', component: ToDoListComponent }
];
export const employeeRouter = routes;
|
home-routing.module.ts1
2
3
4
5
6
7
8
9
10
11
12
13
14
15
16
17
| import { NgModule } from '@angular/core';
import { Routes, RouterModule } from '@angular/router';
import { HomeComponent } from './home.component';
import { employeeRouter } from '../employee/employee.routing';
const routes: Routes = [
{
path: 'home', component: HomeComponent, children: employeeRouter
}
];
@NgModule({
imports: [RouterModule.forChild(routes)],
exports: [RouterModule]
})
export class HomeRoutingModule { }
|
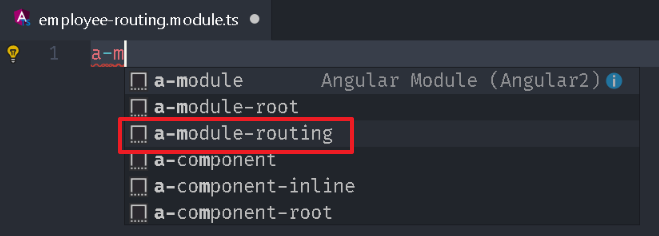
建立路由模組檔 src\app\employee\employee-routing.module.ts,輸入 a-m 就會列出相關指令清單,選擇 a-module-routing 系統就會產生路由模組的程式框架。
將 src\app\employee\employee.routing.ts 的路由規則加進來。
home-routing.module.ts1
2
3
4
5
6
7
8
9
10
11
12
13
14
15
16
17
18
19
20
21
22
23
24
25
26
27
28
| import { NgModule } from '@angular/core';
import { Routes, RouterModule } from '@angular/router';
import { AddressBookComponent } from './address-book/address-book.component';
import { CalendarComponent } from './calendar/calendar.component';
import { FileComponent } from './file/file.component';
import { LeaveComponent } from './leave/leave.component';
import { LogbookComponent } from './logbook/logbook.component';
import { ReimburseComponent } from './reimburse/reimburse.component';
import { ToDoListComponent } from './to-do-list/to-do-list.component';
const routes: Routes = [
{ path: '', redirectTo: 'to-do-list', pathMatch: 'full' },
{ path: 'address-book', component: AddressBookComponent },
{ path: 'calendar', component: CalendarComponent },
{ path: 'file', component: FileComponent },
{ path: 'leave', component: LeaveComponent },
{ path: 'logbook', component: LogbookComponent },
{ path: 'reimburse', component: ReimburseComponent },
{ path: 'to-do-list', component: ToDoListComponent }
];
@NgModule({
imports: [RouterModule.forChild(routes)],
exports: [RouterModule],
})
export class EmployeeRoutingModule { }
|
再將 EmployeeRoutingModule 註冊到 src\app\employee\employee.module.ts 內。
employee.module.ts1
2
3
4
5
6
7
8
9
10
11
12
13
14
15
16
17
18
19
20
21
22
23
24
25
26
27
28
| import { NgModule } from '@angular/core';
import { CommonModule } from '@angular/common';
import { CalendarComponent } from './calendar/calendar.component';
import { AddressBookComponent } from './address-book/address-book.component';
import { LogbookComponent } from './logbook/logbook.component';
import { ToDoListComponent } from './to-do-list/to-do-list.component';
import { FileComponent } from './file/file.component';
import { LeaveComponent } from './leave/leave.component';
import { ReimburseComponent } from './reimburse/reimburse.component';
import { EmployeeRoutingModule } from './employee-routing.module';
@NgModule({
imports: [
CommonModule,
EmployeeRoutingModule
],
declarations: [
CalendarComponent,
AddressBookComponent,
LogbookComponent,
ToDoListComponent,
FileComponent,
LeaveComponent,
ReimburseComponent
]
})
export class EmployeeModule { }
|
loadChildren
上面的步驟只是將路由規則以 CLI 預設模式重新封裝,其實我們可以在建立模組時都先帶入 --routing 參數,最後確定不需要時在移除就好,接下來回到正題,將 EmployeeModule 改成以延遲載入方式啟動。
開啟 src\app\home\home-routing.module.ts 將 children 屬性替換成 loadChildren 屬性,屬性質的規則是 模組路徑 + # + 模組名稱。
home-routing.module.ts1
2
3
4
5
6
7
8
9
10
11
12
13
14
15
16
17
18
| import { NgModule } from '@angular/core';
import { Routes, RouterModule } from '@angular/router';
import { HomeComponent } from './home.component';
import { employeeRouter } from '../employee/employee.routing';
const routes: Routes = [
{
path: 'home', component: HomeComponent,
loadChildren: './../employee/employee.module#EmployeeModule'
}
];
@NgModule({
imports: [RouterModule.forChild(routes)],
exports: [RouterModule]
})
export class HomeRoutingModule { }
|
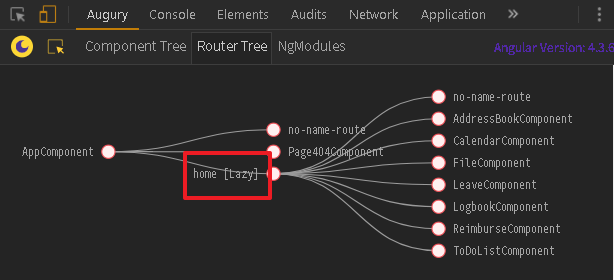
開啟專案,並透過開發工具檢視路由樹,可以發現 EmployeeModule 內的元件好像被載入2次。
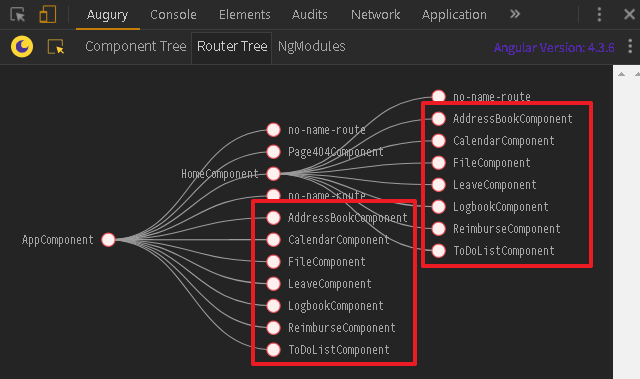
這是因為 HomeModule(src\app\home\home.module.ts) 內有註冊 EmployeeModule,因此我們將它移除在重新測試。
home.module.ts1
2
3
4
5
6
7
8
9
10
11
12
13
14
15
16
17
18
19
20
21
22
23
24
25
| import { NgModule } from '@angular/core';
import { CommonModule } from '@angular/common';
import { HomeRoutingModule } from './home-routing.module';
import { HomeComponent } from './home.component';
import { HeaderComponent } from './header/header.component';
import { AsideComponent } from './aside/aside.component';
import { CustomMaterialModule } from '../custom-material.module';
@NgModule({
imports: [
CommonModule,
HomeRoutingModule,
CustomMaterialModule,
],
declarations: [
HomeComponent,
HeaderComponent,
AsideComponent
]
})
export class HomeModule { }
|
看起來似乎是正常的,但是到底有沒有延遲載入卻很難看出來。
嘗試將 home-routing.module.ts 的 component: HomeComponent 移除看看。
home-routing.module.ts1
2
3
4
5
6
7
8
9
10
11
12
13
14
15
16
17
18
| import { NgModule } from '@angular/core';
import { Routes, RouterModule } from '@angular/router';
import { HomeComponent } from './home.component';
import { employeeRouter } from '../employee/employee.routing';
const routes: Routes = [
{
path: 'home',
loadChildren: './../employee/employee.module#EmployeeModule'
}
];
@NgModule({
imports: [RouterModule.forChild(routes)],
exports: [RouterModule]
})
export class HomeRoutingModule { }
|
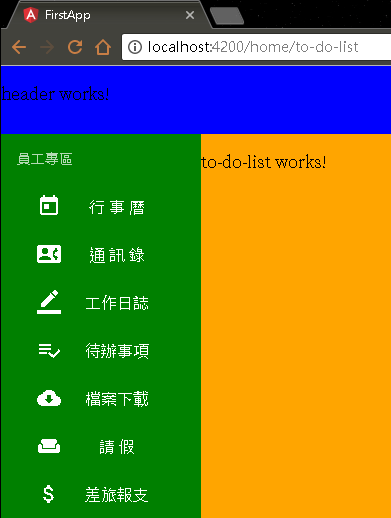
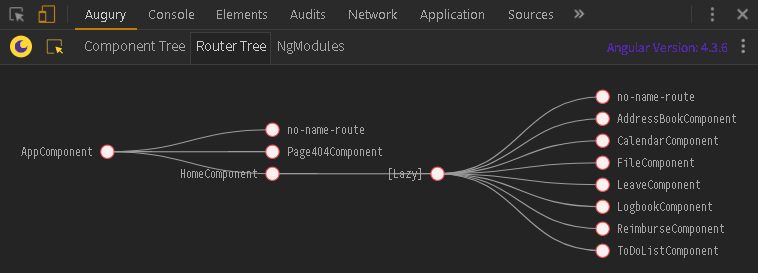
可想而知畫面就會少掉 HomeComponent,但是有趣的是路由樹內卻出現 [lazy] 的字樣,這樣就表示在 home 後面分支都是透過延遲載入方式加進來的。
看起來似乎當有使用 component 屬性時就不會啟用延遲載入,變通的方式是將在延遲載入的模組拉到 children 屬性內,等於在往下延伸一層路由。
home-routing.module.ts1
2
3
4
5
6
7
8
9
10
11
12
13
14
15
16
17
18
19
| import { NgModule } from '@angular/core';
import { Routes, RouterModule } from '@angular/router';
import { HomeComponent } from './home.component';
import { employeeRouter } from '../employee/employee.routing';
const routes: Routes = [
{
path: 'home', component: HomeComponent, children: [
{ path: '', loadChildren: './../employee/employee.module#EmployeeModule' }
]
}
];
@NgModule({
imports: [RouterModule.forChild(routes)],
exports: [RouterModule]
})
export class HomeRoutingModule { }
|
啟動專案後可以看到畫面變正常,路由樹也有標註 [lazy]。
PreloadAllModules
目前的 延遲載入 模式是當使用者點選時才會載入相關元件,但是 Angular 提供另一個更自動化的參數-PreloadAllModules,透過它的設定下載載入模式會變成自動下載,也就是說使用者在瀏覽器操作同時它會在背景繼續下載剩餘的檔案,當使用者點選到相關功能時就可以直接切換,不必再等待下載,開啟 src\app\app-routing.module.ts 在 RouterModule.forRoot(routes) 加入 preloadingStrategy: PreloadAllModules 參數。
home-routing.module.ts1
2
3
4
5
6
7
8
9
10
11
12
13
14
15
16
17
| import { NgModule } from '@angular/core';
import { PreloadAllModules, Routes, RouterModule } from '@angular/router';
import { Page404Component } from './page404/page404.component';
const routes: Routes = [
{ path: '', redirectTo: 'home', pathMatch: 'full' },
{ path: '404', component: Page404Component }
];
@NgModule({
imports: [RouterModule.forRoot(routes, {
preloadingStrategy: PreloadAllModules
})],
exports: [RouterModule]
})
export class AppRoutingModule { }
|
preloadingStrategy:預設值為 NoPreloading,也就是需要時再下載,當然我們可以以自己客製下載規則,讓常用功能自動下載,其他功能需要時再下載。

[**first-app_2017-09-05.zip**](/uploads/first-app_2017-09-05.zip)