
前言
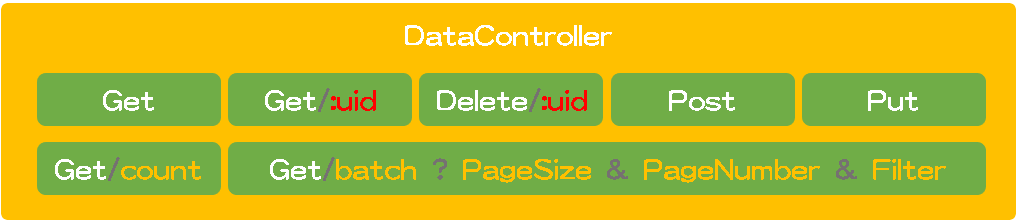
在上一篇 化繁為簡:05 後端篇(四)Controller 我們建立一個 DataController,只要繼承自它的 Controller 就會具有基本的 REST API,接下來我們開始建立前端程式並利用後端 Controller 所提供的 API 來維護資料。
Message
前端部分筆者會以 Angular 來當作範例,介面部分則是使用 PrimeNG 所提供的 Component 來實作,接下來就向後端一樣,要讓開發快速,我們就要將一些繁瑣的事情盡量先完成,後續開發所要做的事情就會越少。
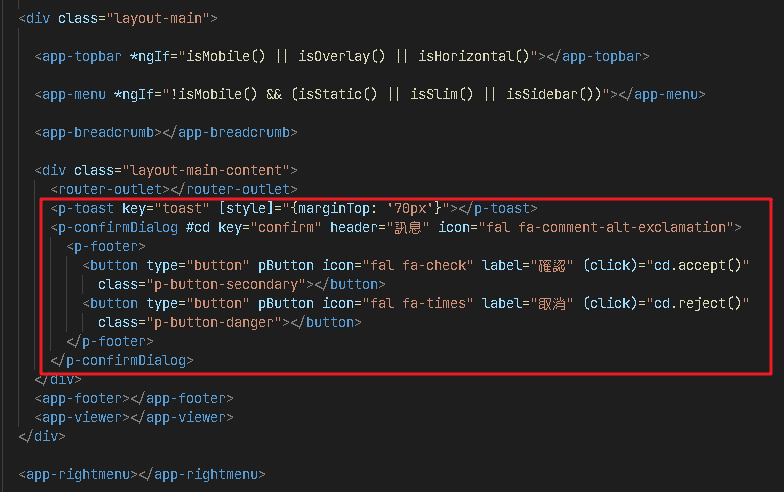
如下圖,訊息方塊與確認對話方塊應該絕大部分系統都會使用到,更進一步的說法是在系統內絕大多數的作業都會用到,如果每個作業都要自己實作這個功能,就會發現一個專案內會重複做很多次。
所以我們可以將這類的 Component 建置在最外層(一般是 AppComponent內),然後透過 service 來控制,這樣整個專案就能夠共用,我們這邊使用了 Toast 與 ConfirmDialog,將它們放置在路由插座(router-outlet)下方,比較特別的是這 2 個 Component 有提供 key 屬性,如果專案內有多組相同的 Component,使用時可以透過指定 key 來決定由哪一個 Component 處理。
從官方文件上來看, PrimeNG 建立了 2 個服務(MessageService 與 ConfirmationService)可以控制它們,所以我們建立一個 MessageService 來負責訊息處理,程式碼如下:
message.service.ts1
2
3
4
5
6
7
8
9
10
11
12
13
14
15
16
17
18
19
20
21
22
23
24
25
26
27
28
29
30
31
32
33
34
35
36
37
38
39
40
41
42
43
44
45
46
47
48
49
50
51
52
53
54
55
56
57
58
59
60
61
| import { Injectable } from '@angular/core';
import { Confirmation, ConfirmationService, MessageService as MsgService } from 'primeng/api';
@Injectable({ providedIn: 'root' })
export class MessageService {
constructor(
private msgService: MsgService,
private confirmation: ConfirmationService) { }
showInfoToast(message: string): void {
this.msgService.clear('toast');
this.msgService.add({
key: 'toast',
severity: 'info',
summary: '訊息',
detail: message,
life: 1000
});
}
showWarnToast(message: string): void {
this.msgService.clear('toast');
this.msgService.add({
key: 'toast',
severity: 'warn',
summary: '警告',
detail: message,
life: 3000
});
}
showErrorToast(message: string): void {
this.msgService.clear('toast');
this.msgService.add({
key: 'toast',
severity: 'error',
summary: '錯誤',
detail: message,
life: 5000
});
}
showSuccessToast(message: string): void {
this.msgService.clear('toast');
this.msgService.add({
key: 'toast',
severity: 'success',
summary: '成功',
detail: message,
life: 1000
});
}
confirm(confirmation: Confirmation): void {
if (!confirmation) {
return;
}
confirmation.key = 'confirm';
this.confirmation.confirm(confirmation);
}
}
|
因為撞衫了,所以將官方的 MessageService 另外取一個別名 MsgService。
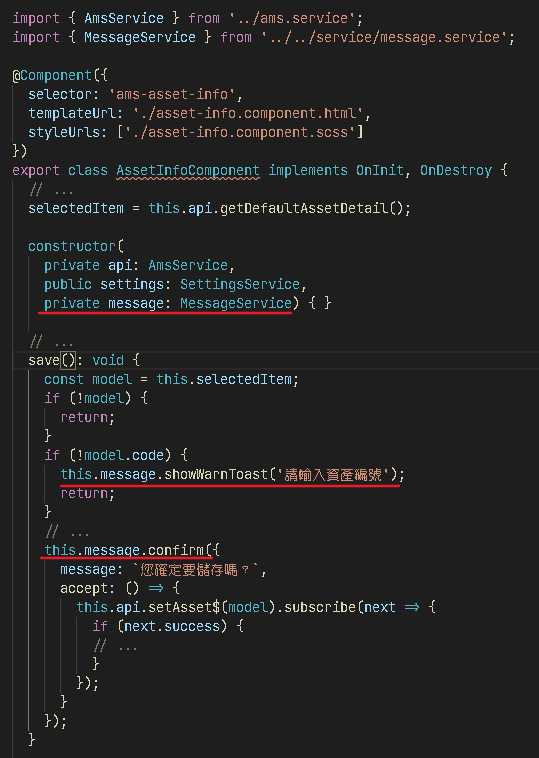
Component 可以透過建構式宣告來取得 MessageService 使用,Component 就不需要特別處理訊息效果。
Http
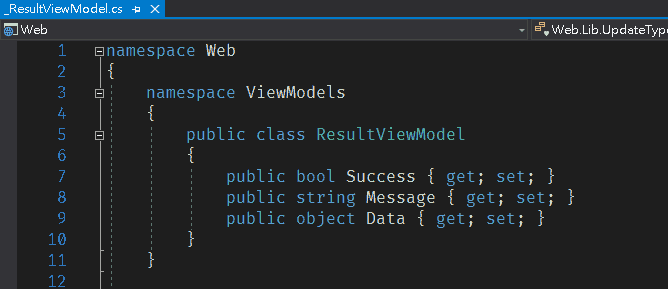
還記得我們在後端建立 Controller 時,有特別建立一個 ResultViewModel,它主要在原來傳遞的資料之外再加入訊息資訊,現在我們要做的就是透過 MessageService 來呈現這些訊息。
Model
首先我們需要依照後端 ViewModel 來建立對應的 Model,這樣才能透過 TypeSript 來檢核資料格式,如果使用 VS Code 來開發,我們可以透過一些延伸模組協助我們直接將 C# 程式碼轉換成 TypeSript,筆者是透過 CSharp2TS 來做轉換,如下圖操作,我們先建立一個 api-result.ts 檔案,再將 ResultViewModel 程式碼複製過去並全選,接著開啟啟命令選擇(ctrl+shift+p),選擇 Convert C# To TypeScript 就可以轉換,接著同樣步驟來建立 QueryParameters 的 Model。
筆者習慣會移除字尾的 ViewModel,因為 Result 比較不明確,所以改名為 ApiResult,表示由 REST API 回傳的結果。
HttpService
以先前概念一樣,如果每次請求都要自己處理 ApiResult,那就會顯得有點笨重,所以我們在建立一個 HttpService,將 HttpClient 打包起來,處理後端傳遞過來的訊息,並將資料轉換成原本的格式,程式碼如下:
http.service.ts1
2
3
4
5
6
7
8
9
10
11
12
13
14
15
16
17
18
19
20
21
22
23
24
25
26
27
28
29
30
31
32
33
34
35
36
37
38
39
40
41
42
43
44
45
46
47
48
49
50
51
52
53
54
55
56
57
58
59
60
61
62
63
64
65
66
67
68
69
70
71
72
73
74
75
76
77
78
79
80
81
82
83
84
85
| import { Injectable } from '@angular/core';
import { HttpClient } from '@angular/common/http';
import { tap, map } from 'rxjs/operators';
import { Observable, } from 'rxjs';
import { MessageService } from './message.service';
import { ApiResult, QueryParameters } from '../models/models';
@Injectable({ providedIn: 'root' })
export class HttpService {
constructor(
private http: HttpClient,
private message: MessageService
) { }
private showMessage(result: ApiResult, title = '查詢', showMsg = true): void {
if (!result || !showMsg) {
return;
}
if (result.success) {
if (result.message) {
this.message.showInfoToast(result.message);
} else {
this.message.showInfoToast(`${title}成功`);
}
} else {
if (result.message) {
this.message.showErrorToast(result.message);
} else {
this.message.showErrorToast(`${title}失敗`);
}
}
}
getData<T>(optName: string, uid: string, showMsg = true): Observable<T> {
const url = `/api/${optName}/${uid}`;
return this.http.get<ApiResult>(url).pipe(
tap(value => this.showMessage(value, '查詢', showMsg)),
map(value => value.data as T)
);
}
getAllData<T>(optName: string, showMsg = true): Observable<T> {
const url = `/api/${optName}`;
return this.http.get<ApiResult>(url).pipe(
tap(value => this.showMessage(value, '查詢', showMsg)),
map(value => value.data as T)
);
}
getCount(optName: string): Observable<number> {
const url = `/api/${optName}/count`;
return this.http.get<ApiResult>(url).pipe(
map(value => value.data as number)
);
}
getBatchData<T>(optName: string, query: QueryParameters): Observable<T> {
const url = `/api/${optName}/batch?pageNumber=${query.pageNumber}&pageSize=${query.pageSize}&filter=${query.filter}`;
return this.http.get<ApiResult>(url).pipe(
map(value => value.data as T)
);
}
postData(optName: string, model: any, showMsg = true): Observable<ApiResult> {
const url = `/api/${optName}`;
return this.http.post<ApiResult>(url, model).pipe(
tap(value => this.showMessage(value, '新增', showMsg))
);
}
putData(optName: string, model: any, showMsg = true): Observable<ApiResult> {
const url = `/api/${optName}`;
return this.http.put<ApiResult>(url, model).pipe(
tap(value => this.showMessage(value, '更新', showMsg))
);
}
deleteData(optName: string, model: any, showMsg = true): Observable<ApiResult> {
const url = `/api/${optName}/${model.uid}`;
return this.http.delete<ApiResult>(url).pipe(
tap(value => this.showMessage(value, '刪除', showMsg))
);
}
}
|
我們透過 RxJS 的 tap 來處理訊息,透過 map 來將 ApiResult 轉換回原始的資料,並增加 showMsg 參數,讓我們可以自行決定使否要顯示訊息,postData、putData、deleteData 的回傳型別其實也可以改成 boolean,筆者保留 ApiResult 是因為其實後端可以透過 data 屬性再夾帶其他資料,例如:當資料新增成功時,筆者會讓後端回傳時,再 data 夾帶這筆資料的 uid,這樣我們可以立即透過 uid 來查詢資料,確認寫入資料是否正確。
JSON Web Token
過去筆者其實會在 HttpService 的 HTTP 請求方法內加入 RxJS 的 catchError 來處理例外錯誤,Angular 本身提供了攔截器(HttpInterceptor)功能,讓我們可以對所有的 Http 請求加工,因此我們將 JWT 的 Token 參數與後端回傳的錯誤處理都利用 HttpInterceptor 來處理。
JWT 主要是我們在身分驗證(登入)成功之後,後端會派發一個 Token 當作我們的身份令牌,後續我們可以在發出 HTTP 請求時,將 Token 夾帶在 Authorization 這個 Header 內,後就可以藉此來驗證請求者的身分。
接下來我們來建立一個 api.interceptor.ts,程式碼如下:
http.api.interceptor.ts1
2
3
4
5
6
7
8
9
10
11
12
13
14
15
16
17
18
19
20
21
22
23
24
25
26
27
28
29
30
31
32
33
34
35
36
37
38
39
40
41
42
43
44
45
46
47
48
49
50
51
52
53
54
55
56
57
58
59
60
61
62
63
64
65
66
67
68
69
70
71
72
73
74
75
76
77
78
79
80
81
82
83
84
85
86
87
| import { SettingsService } from './settings.service';
import { Injectable } from '@angular/core';
import {
HttpRequest,
HttpHandler,
HttpEvent,
HttpInterceptor,
HttpErrorResponse
} from '@angular/common/http';
import { Observable } from 'rxjs';
import { MessageService } from './message.service';
import { throwError } from 'rxjs';
import { catchError } from 'rxjs/operators';
@Injectable()
export class ApiInterceptor implements HttpInterceptor {
constructor(
private settings: SettingsService,
private message: MessageService) { }
intercept(request: HttpRequest<unknown>, next: HttpHandler): Observable<HttpEvent<unknown>> {
const token = this.settings.getToken();
if (token) {
const req = request.clone({ setHeaders: { Authorization: `Bearer ${token}` } });
return next.handle(req).pipe(
catchError(
error => this.handleError(error, '查詢失敗')
)
);
}
return next.handle(request);
}
private handleError(error: HttpErrorResponse, message = ''): Observable<never> {
if (error.error instanceof ErrorEvent) {
message = error.error.message;
this.message.showErrorToast(message);
} else {
const status = error.status;
if (message) {
message = `(${status}) `;
}
switch (status) {
case 400:
if (error.error) {
message = error.error;
} else {
message += '伺服器無法處理請求';
}
break;
case 401:
message += '身分認證已失效,請先登出再重新登入';
break;
case 403:
message += '未授權存取';
break;
case 404:
message += '找不到資源';
break;
case 408:
message += '伺服器連線逾時';
break;
case 500:
message += '伺服器端錯誤';
break;
case 502:
message += '無法連線到伺服器';
break;
case 503:
message += '伺服器端暫時無法處理請求';
break;
case 504:
message += '無法連線到伺服器';
break;
default:
if (!error.error) {
message += error.error;
}
break;
}
this.message.showErrorToast(message);
}
console.log(message);
return throwError(message);
}
}
|
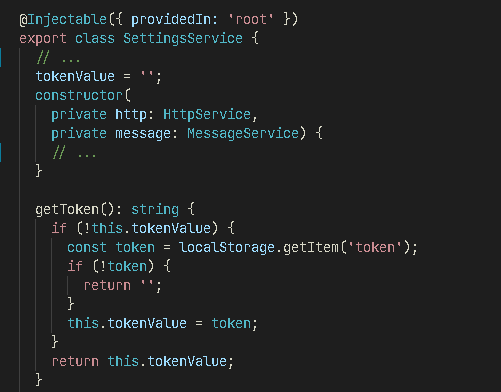
getToken 只是存取 SettingsService 上的 tokenValue,它是儲存 JTW 回傳的 Token,筆者會將系統參數由 SettingsService 來處理。
這邊發生錯誤時筆者會利用 console.log(message); 來讓瀏覽器記錄以方便開發過程測試,實際上線後是否仍允許紀錄,我們還是要考量後端回傳的錯誤訊息內容來評斷,例如包含 SQL 的錯誤資訊,那就應該變免(事實上應該在後端就要排除掉)。
後記
有開發過 Angular 的人可能就會發現到,透過 HttpService 包裝之後,我們對後端發送任何請求之後,只要專注在資料本身,不論是錯誤處理或是訊息顯示都已經被處理了,而且我們在 HttpService 內的 Get 處理都已經順便還原回原始資料了,這樣 Component 就可專注在介面的資料呈現與操作互動上。