
前言
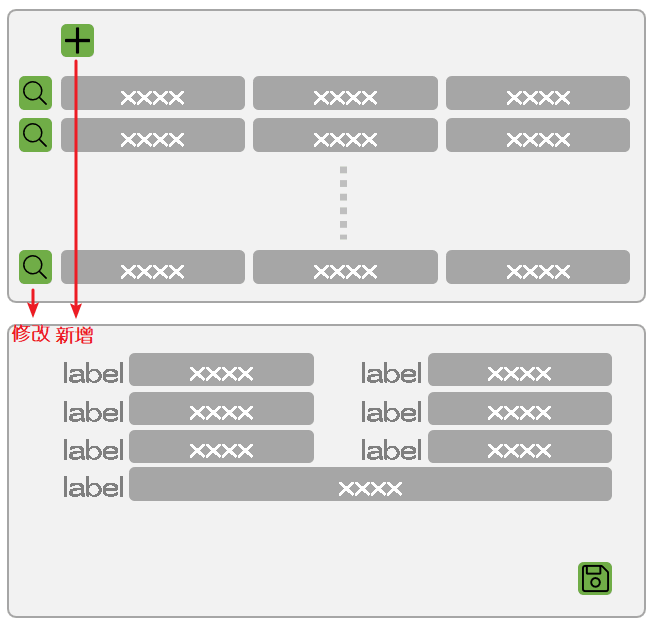
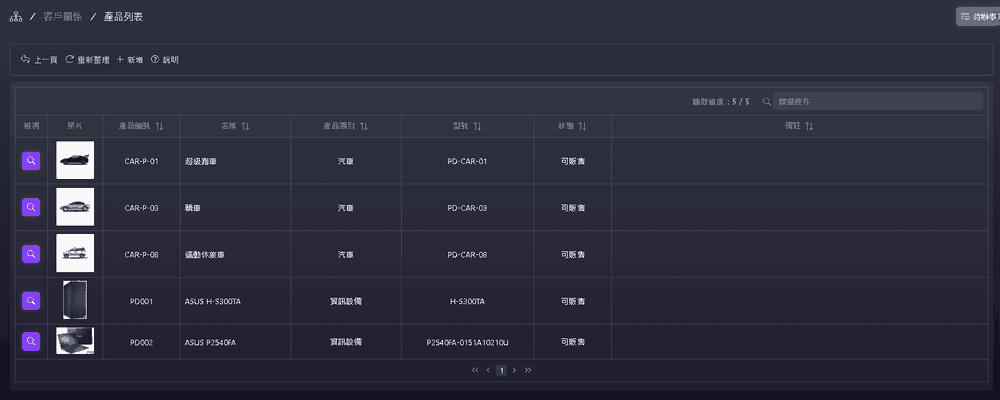
在上一篇 化繁為簡:06 前端篇(一) 我們把前端的主要的前置作業準備好了,接下來就是直接時做一個產品的維護作業,大致規劃如下圖,這是一個很常見的維護功能,我們會有一個資訊清單列表負責呈現多筆資料,上面僅會顯示重要欄位資訊,另外還有一個維護頁面可以檢視與及編輯完整資訊。
CRM Module
為了避免 Angular 打包後程式過大,所以我們採用延遲載入方式處理,步驟如下:
建立一個包含路由功能的 CRM(Customer Relationship Management) NgModule,指令如下:
ng g m crm --route crm -m app.module
預設建立的 CrmComponent 如果沒有使用可以移除。
在 crm 目錄下建立一個 crm.service.ts 服務(Service),主要用來 CRM 下面的 Component 會使用到的服務,指令如下:
ng g s crm/crm
因為僅限於 CRM,所以我們將 crm.service.ts 內的 { providedIn: 'root' } 移除,並手動將 CrmService 註冊到 CrmModule 的 providers 內。
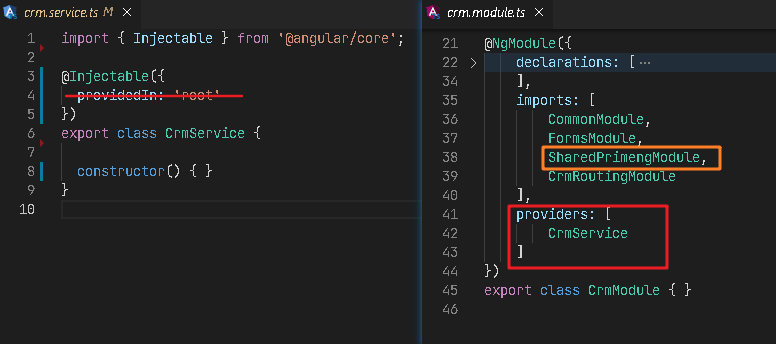
SharedPrimengModule 主要是存放 PrimeNG 提供的 Component,這會因為大家使用的元件而有所不同。

一清單以及編輯功能分別建立對應的 Component (ProductListComponent、ProductInfoComponent),指令如下:
ng g c crm/productList、ng g c crm/productInfo
筆者習慣將 selector 的前置詞 app 換成 NgModule 的名稱。

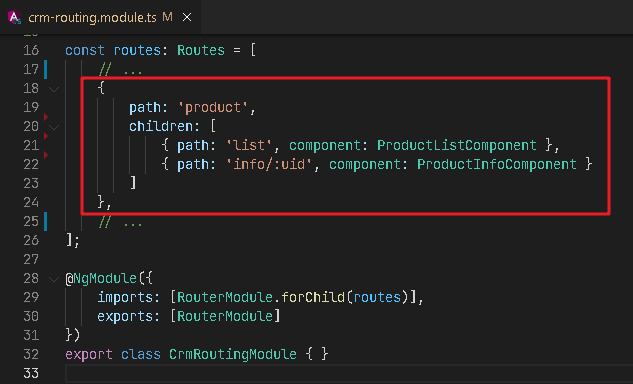
最後再在 CrmRoutingModule 內補上 Component 的路由規則。
REST API
接下來要依照後端 REST 服務所回傳的資料結構建立對應的 Model ,我們先建立一個 product.ts 檔,接著直接將後端 ProductViewModel、ProductDetailViewModel 複製過來,再透過轉換工具幫我們轉換成 TypeScript 語法。
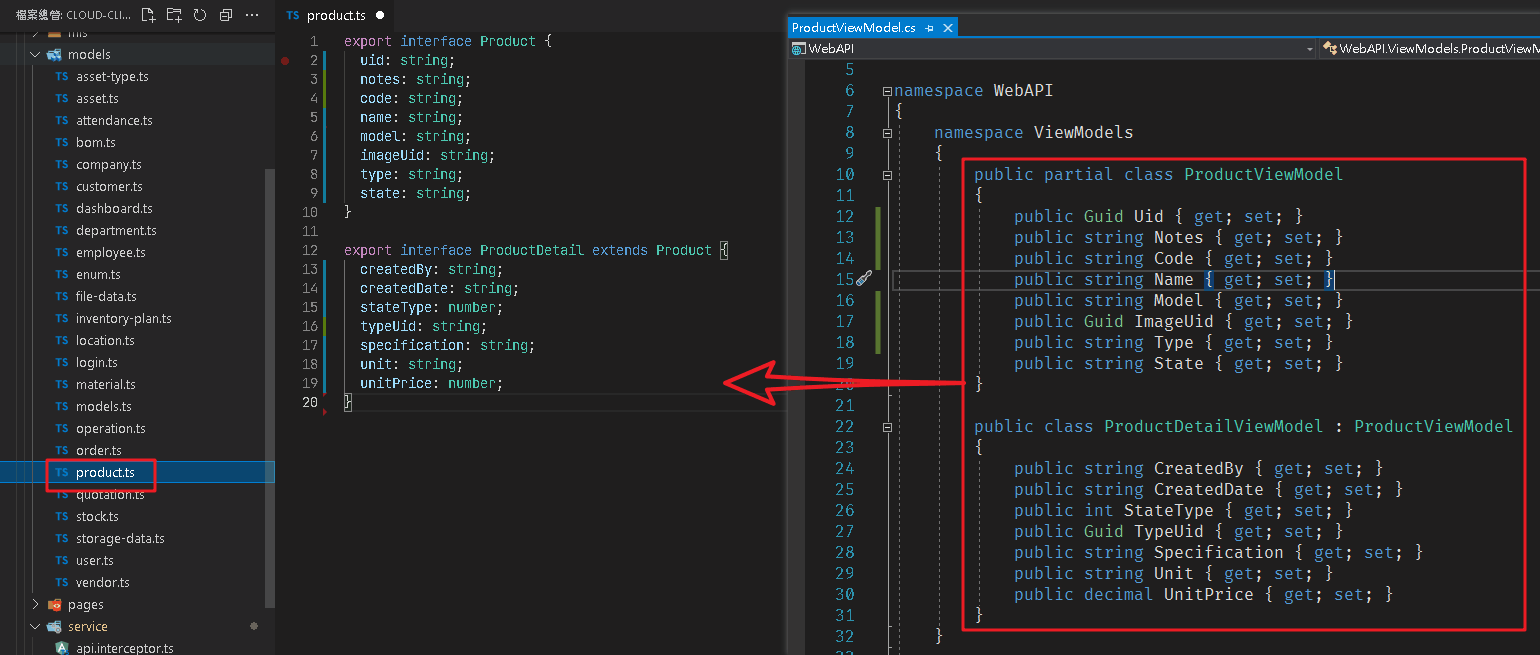
避免名稱過長,所以筆者會移除字尾的 ViewModel。
接著在 CrmService 加入 HttpService,並利用 HttpService 來建立 REST 相關方法,順建建立一個可以取得 DetailModel 實體的方法 getDefaultProductDetail(),程式碼如下:
crm.service.ts1
2
3
4
5
6
7
8
9
10
11
12
13
14
15
16
17
18
19
20
21
22
23
24
25
26
27
28
29
30
31
32
33
34
35
36
37
38
39
40
41
42
43
44
45
46
47
48
49
50
51
52
53
54
55
56
57
58
59
60
61
62
63
64
65
66
67
| import { Injectable } from '@angular/core';
import { Observable, of } from 'rxjs';
import { HttpService } from '../service/http.service';
import { Controller } from '../models/enum';
import { ApiResult, QueryParameters } from '../models/models';
import { Product, ProductDetail } from '../models/product';
import { UUID_EMPTY } from '../service/system';
@Injectable()
export class CrmService {
constructor(
private http: HttpService) { }
getDefaultProductDetail(): ProductDetail {
const item: ProductDetail = {
createdBy: '',
createdDate: '',
notes: '',
uid: UUID_EMPTY,
name: '',
code: '',
typeUid: UUID_EMPTY,
type: '',
stateType: 0,
state: '',
model: '',
imageUid: UUID_EMPTY,
specification: '',
unit: '',
unitPrice: 0
};
return item;
}
getProducts$(): Observable<Product[]> {
return this.http.getAllData<Product[]>(Controller.Product);
}
getProductsCount$(): Observable<number> {
return this.http.getCount(Controller.Product);
}
getProductsByBatch$(query: QueryParameters): Observable<Product[]> {
return this.http.getBatchData<Product[]>(Controller.Product, query);
}
getProductById$(uid: string): Observable<ProductDetail> {
if (!uid || uid === UUID_EMPTY) {
const item = this.getDefaultProductDetail();
return of(item);
}
return this.http.getData<ProductDetail>(Controller.Product, uid);
}
setProduct$(model: ProductDetail): Observable<ApiResult> {
if (model.uid && model.uid !== UUID_EMPTY) {
return this.http.putData(Controller.Product, model);
} else {
return this.http.postData(Controller.Product, model);
}
}
removeProduct$(model: Product): Observable<ApiResult> {
return this.http.deleteData(Controller.Product, model);
}
}
|
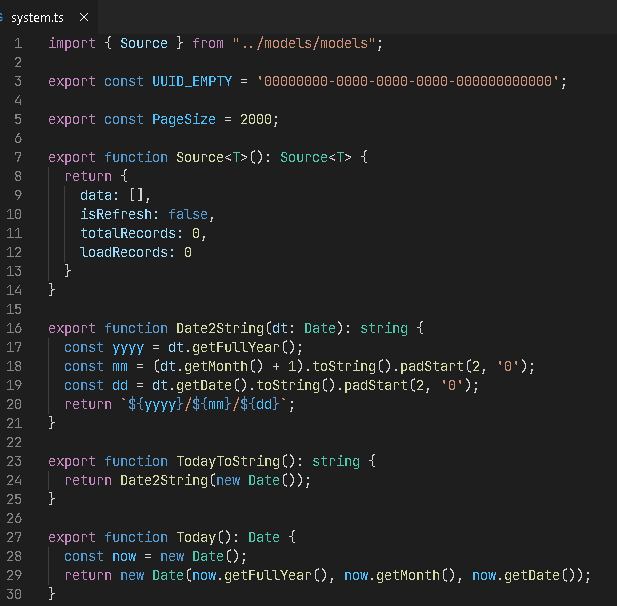
system.ts 內會放置一些常用常數或方法。
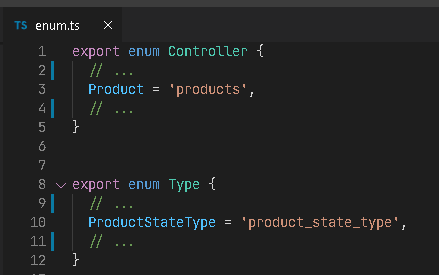
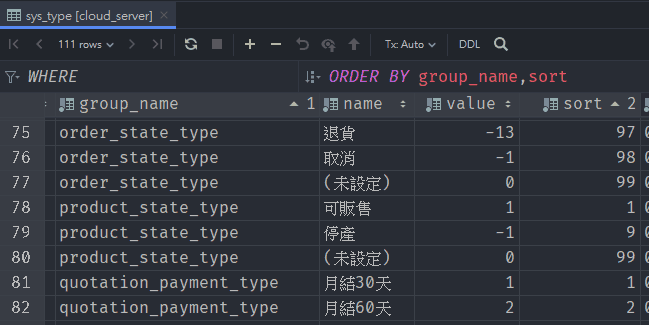
enum.ts 內則是將 Controller 名稱以 enum 方式儲存,這樣就可以避免輸入錯誤,Type 其實就是資料庫用來存放代碼表資訊的資料表 sys_type 內的 group_name。
清單列表
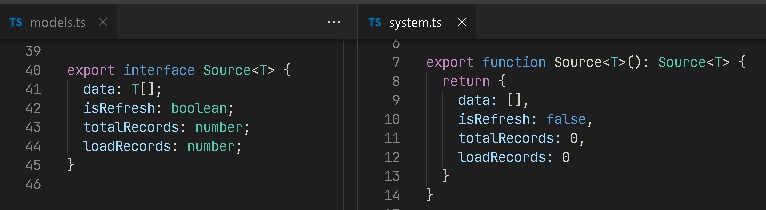
CrmService 的 getProducts$() 方法提供的是一次抓取全部資料的功能,但是如果資料量過大時就不適合使用,所以改採用分批下載方式處理,我們先透過 getProductsCount$() 取得資料總筆數,接著利用 getProductsByBatch$() 逐批抓取,針對這種批次下載方式,我們建立一個介面(Source<T>)來表示要使用到的變數,並建立一個實作見面的方法 Source<T>()。
product-list.component.ts1
2
3
4
5
6
7
8
9
10
11
12
13
14
15
16
17
18
19
20
21
22
23
24
25
26
27
28
29
30
31
32
33
34
35
36
37
38
39
40
41
42
43
44
45
46
47
48
49
50
51
52
53
54
55
56
57
58
59
60
61
62
63
64
65
66
67
68
69
70
71
72
73
74
75
76
77
78
79
80
81
82
83
84
85
86
87
88
89
90
91
92
93
94
95
96
97
98
99
100
101
102
103
104
105
106
| import { Component, OnDestroy, OnInit } from '@angular/core';
import { Router } from '@angular/router';
import { Location } from '@angular/common';
import { MenuItem } from 'primeng/api';
import { CrmService } from '../crm.service';
import { SettingsService } from '../../service/settings.service';
import { MessageService } from '../../service/message.service';
import { QueryParameters } from '../../models/models';
import { Product } from '../../models/product';
import { PageSize, Source } from '../../service/system';
@Component({
selector: 'crm-product-list',
templateUrl: './product-list.component.html',
styleUrls: ['./product-list.component.scss']
})
export class ProductListComponent implements OnInit, OnDestroy {
operations: MenuItem[] = [];
source = Source<Product>();
filterFields: string[] = [
'name',
'code',
'type',
'state',
'model',
'notes'
];
constructor(
private location: Location,
private router: Router,
private api: CrmService,
public settings: SettingsService,
private message: MessageService) { }
ngOnDestroy(): void {
this.source.isRefresh = false;
}
ngOnInit(): void {
this.operations = [
{
label: '上一頁',
icon: 'fal fa-reply',
command: () => this.location.back()
},
{
label: '重新整理',
icon: 'fal fa-redo',
command: () => this.refresh()
},
{
label: '新增',
icon: 'fal fa-plus',
command: () => this.router.navigateByUrl(`/crm/product/info/${UUID_EMPTY}`)
},
{
label: '說明',
icon: 'fal fa-question-circle'
}
];
this.refresh();
}
refresh(): void {
this.api.getProductsCount$().subscribe(next => {
this.source = Source<Product>();
this.source.totalRecords = next;
if (this.source.totalRecords <= 0) {
this.message.showInfoToast('查無資料');
return;
}
this.source.isRefresh = true;
this.getList();
});
}
getList(): void {
if (!this.source.isRefresh || this.source.totalRecords <= 0) {
return;
}
const dataCount = this.source.data.length;
const pageSize = PageSize;
const pageNumber = parseInt((dataCount / pageSize).toString(), 10);
const query: QueryParameters = {
pageNumber,
pageSize,
filter: ''
};
this.api.getProductsByBatch$(query).subscribe(next => {
this.source.data = this.source.data.concat(...next);
this.source.loadRecords = this.source.data.length;
if (!next || next.length < pageSize) {
this.source.isRefresh = false;
this.source.totalRecords = this.source.loadRecords;
this.message.showInfoToast('查詢成功');
return;
}
this.getList();
});
}
}
|
比較特別的是我實作了 Angular Companent 生命週期中的 OnDestroy,我們在 Source 介面有一個變數 isRefresh,它是用來記錄目前狀態是否在更新(下載)中,當我們離開 Companent 時會自動觸發 OnDestroy,我們藉此將 isRefresh 改成 false 來中止未完成的下載動作。
product-list.component.html 範本內,我們利用 PrimeNG 的 Table 來呈現,主要內容如下:
product-list.component.html1
2
3
4
5
6
7
8
9
10
11
12
13
14
15
16
17
18
19
20
21
22
23
24
25
26
27
28
29
30
31
32
33
34
35
36
37
38
39
40
41
42
43
44
45
46
47
48
49
50
51
52
53
54
55
56
57
58
59
60
61
62
| <div class="p-grid">
<div class="p-col-12">
<p-menubar [model]="operations"></p-menubar>
<div class="card" style="margin-top: 12px;">
<div class="p-grid">
<p-table #dt [value]="source.data" [globalFilterFields]="filterFields" dataKey="uid" [paginator]="true"
[rows]="10" styleClass="p-datatable-gridlines">
<ng-template pTemplate="caption">
<div style="text-align: right">
<span style="margin: 0px 24px;font-weight: bold;font-size: 14px;">讀取進度: /
</span>
<i class="fal fa-search" style="margin:4px 4px 0 0"></i>
<input #search type="text" pInputText size="50" placeholder="篩選條件"
(input)="dt.filterGlobal(search.value, 'contains')" style="width:auto">
</div>
</ng-template>
<ng-template pTemplate="header">
<tr>
<th style="text-align:center; width: 4.2rem;">檢視</th>
<th style="text-align:center; width: 100px;">照片</th>
<th pSortableColumn="code" style="text-align:center; width: 140px;">
產品編號<p-sortIcon field="code"></p-sortIcon>
</th>
<th pSortableColumn="name" style="text-align:center; width: 200px;">
名稱<p-sortIcon field="name"></p-sortIcon>
</th>
<th pSortableColumn="type" style="text-align:center; width: 200px">
產品類別<p-sortIcon field="type"></p-sortIcon>
</th>
<th pSortableColumn="model" style="text-align:center; width: 240px;">
型號<p-sortIcon field="model"></p-sortIcon>
</th>
<th pSortableColumn="state" style="text-align:center; width: 140px;">
狀態<p-sortIcon field="state"></p-sortIcon>
</th>
<th pSortableColumn="notes" style="text-align:center;">
備註<p-sortIcon field="notes"></p-sortIcon>
</th>
</tr>
</ng-template>
<ng-template pTemplate="body" let-rowData>
<tr>
<td style="text-align:center">
<button pButton type="button" icon="fal fa-search" class="p-button-info"
[routerLink]="['/crm/product/info',rowData.uid]"></button>
</td>
<td style="text-align:center">
<img [src]="'api/images/'+rowData.imageUid+'?w=68&h=68'" [alt]="rowData.name" />
</td>
<td style="text-align:center"></td>
<td></td>
<td style="text-align:center"></td>
<td style="text-align:center"></td>
<td style="text-align:center"></td>
<td></td>
</tr>
</ng-template>
</p-table>
</div>
</div>
</div>
</div>
|
PrimeNG 的 Table 內建了搜尋功能,我們可以透過屬性 globalFilterFields 來決定要搜尋的欄位,另外我們透過 loadRecords 與 totalRecords 來讓使用者知道目前下載進度。
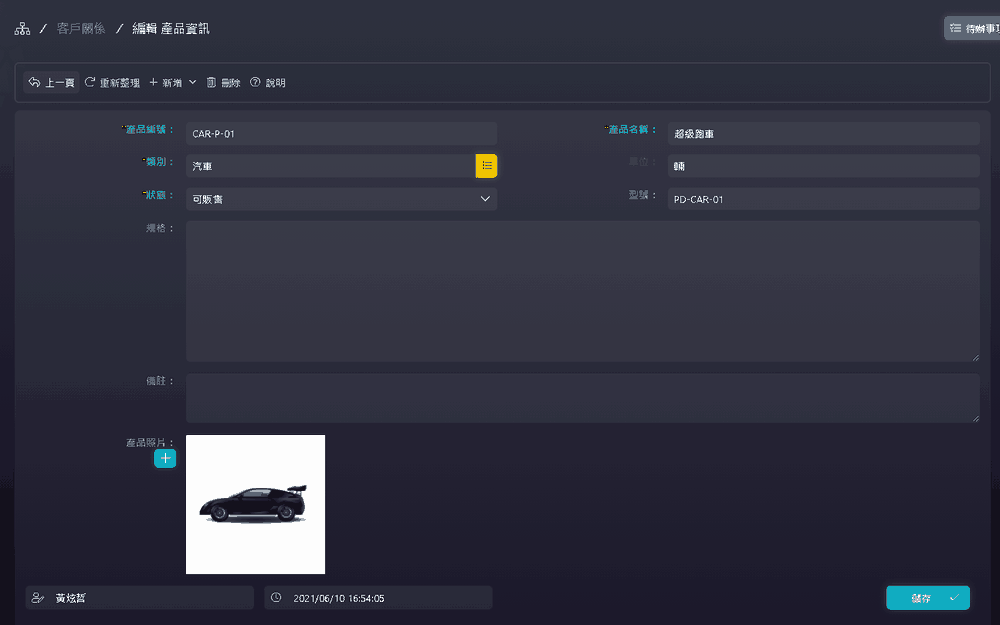
我們可以透過功能選單的新增按鈕或是產品項目的檢視按鈕切換到編輯頁面(ProductInfoComponent),呈現效果大概如下圖:
筆者使利用 PrimeNG 的 Atlantis 版型來開發,實際效果會因為 CSS 而有所差異。
雖然 PrimeNG 也有提供圖示字型 PrimeIcons,不過筆者是使用 Font Awesome。
因為測試環境資料筆數不多所以沒有差異,但是當比數多時,就會有下面的效果。
資料編輯
編輯頁面內我們主要透過 CrmService 的 getProductById$(uid: string) 方法來抓取資料,因為有些欄位的資料是透過選單來選取決定,所以正常我們還需要額外抓取這些選單資料(例如:產品狀態 stateTypes),這時候比較簡單的方式是透過 RxJS 的 forkJoin 將所有請求給包覆起來,它會等待所有請求(observables)都完成時才回應,主要程式碼如下:
product-info.component.ts1
2
3
4
5
6
7
8
9
10
11
12
13
14
15
16
17
18
19
20
21
22
23
24
25
26
27
28
29
30
31
32
33
34
35
36
37
38
39
40
41
42
43
44
45
46
47
48
49
50
51
52
53
54
55
56
57
58
59
60
61
62
63
64
65
66
67
68
69
70
71
72
73
74
75
76
77
78
79
80
81
82
83
84
85
86
87
88
89
90
91
92
93
94
95
96
97
98
99
100
101
102
103
104
105
106
107
108
109
110
111
112
113
114
115
116
117
118
119
120
121
122
123
124
125
126
127
128
129
130
131
132
133
134
135
136
137
138
139
140
141
142
143
144
145
146
147
148
149
150
151
152
153
154
155
156
157
158
| import { Component, OnInit } from '@angular/core';
import { ActivatedRoute } from '@angular/router';
import { Location } from '@angular/common';
import { forkJoin } from 'rxjs';
import { MenuItem } from 'primeng/api';
import { CrmService } from '../crm.service';
import { SettingsService } from '../../service/settings.service';
import { MessageService } from '../../service/message.service';
import { Type } from '../../models/enum';
import { ItemType } from '../../models/models';
import { UUID_EMPTY } from '../../service/system';
@Component({
selector: 'crm-product-info',
templateUrl: './product-info.component.html',
styleUrls: ['./product-info.component.scss']
})
export class ProductInfoComponent implements OnInit {
operations: MenuItem[] = [];
uid = '';
selectedItem = this.api.getDefaultProductDetail();
stateTypes: ItemType[] = [];
constructor(
private location: Location,
private route: ActivatedRoute,
private api: CrmService,
public settings: SettingsService,
private message: MessageService) { }
ngOnInit(): void {
const uid = this.route.snapshot.paramMap.get('uid');
if (!uid) {
return;
}
this.uid = uid;
this.operations = [
{
label: '上一頁',
icon: 'fal fa-reply',
command: () => this.location.back()
},
{
label: '重新整理',
icon: 'fal fa-redo',
command: () => this.refresh()
},
{
label: '新增',
icon: 'fal fa-plus',
items: [
{
label: '空白',
icon: 'fal fa-file',
command: () => this.newData(true)
},
{
label: '複製',
icon: 'fal fa-copy',
command: () => this.newData(false)
},
{
label: '從物料複製',
icon: 'fal fa-copy',
command: () => this.newData(true, true)
}
]
},
{
label: '刪除', icon: 'fal fa-trash-alt',
command: () => this.remove()
},
{
label: '說明',
icon: 'fal fa-question-circle'
}
];
this.refresh();
}
refresh(): void {
forkJoin([
this.api.getProductById$(this.uid),
this.api.getTypes$(Type.ProductStateType)
]).subscribe(next => {
this.selectedItem = next[0];
this.stateTypes = next[1];
});
}
newData(isEmpty: boolean, withMaterial = false): void {
if (isEmpty) {
this.selectedItem = this.api.getDefaultProductDetail();
} else {
const emptyObj = {
uid: UUID_EMPTY,
createdBy: '',
createdDate: '',
code: ''
};
const model = Object.assign({}, this.selectedItem, emptyObj);
if (model.stateType < 0) {
model.stateType = 0;
}
this.selectedItem = model;
}
this.stateTypes = this.stateTypes.filter(x => x.value >= 0);
this.location.replaceState(`/crm/product/info/${this.uid}`);
}
save(state = 0, type = '儲存'): void {
const model = this.selectedItem;
if (!model) {
return;
}
if (!model.code) {
this.message.showWarnToast('請輸入編號');
return;
}
if (!model.name) {
this.message.showWarnToast('請輸入產品名稱');
return;
}
if (!model.stateType) {
this.message.showWarnToast('請選擇產品狀態');
return;
}
if (state !== 0) {
model.stateType = -1;
}
this.message.confirm({
message: `您確定要${type}嗎?`,
accept: () => {
this.api.setProduct$(model).subscribe(next => {
if (next.success) {
this.location.replaceState(`/crm/product/info/${this.uid}`);
this.refresh();
}
});
}
});
}
remove(): void {
const model = this.selectedItem;
this.message.confirm({
message: '您確定要刪除嗎?',
accept: () => {
this.api.removeProduct$(model).subscribe(next => {
if (next.success) {
this.location.back();
}
});
}
});
}
}
|
api.getTypes$() 主要是去後端抓取代碼表,後續有需要再作補充說明,時做上並不困難。
原則上類別變數都會給予值避免為 undefined,這在使用 Angular 的 Strict mode 時可以避免一些麻煩。
對於新增頻繁的作業,我們可以直接在維護頁面也提供新增按鈕,這樣使用者就可以快速新增資料,比較特別的是我們提供可以複製現有資料來新增,這樣可以減少輸入時間,在此利用 Object.assign 來複製既有資料,同時帶入 emptyObj 將一些重要欄位給還原成初始值。
product-info.component.html1
2
3
4
5
6
7
8
9
10
11
12
13
14
15
16
17
18
19
20
21
22
23
24
25
26
27
28
29
30
31
32
33
34
35
36
37
38
39
40
41
42
43
44
45
46
47
48
49
50
51
52
53
54
55
56
57
58
59
60
61
62
63
64
65
66
67
68
69
70
71
72
73
74
75
76
77
78
79
80
81
82
83
84
85
86
87
88
89
90
91
92
93
94
95
96
97
| <div class="p-grid">
<div class="p-col-12">
<p-menubar [model]="operations"></p-menubar>
<div class="card" style="margin-top: 12px;">
<div class="p-grid">
<div class="p-col-12 p-md-2 text-lable-required text-md-right">
<label>產品編號:</label>
</div>
<div class="p-col-12 p-md-4">
<div class="p-inputgroup">
<input pInputText [(ngModel)]="selectedItem.code" [readonly]="config.read">
</div>
</div>
<div class="p-col-12 p-md-2 text-lable-required text-md-right">
<label>產品名稱:</label>
</div>
<div class="p-col-12 p-md-4">
<div class="p-inputgroup">
<input pInputText [(ngModel)]="selectedItem.name" [readonly]="config.read">
</div>
</div>
<div class="p-col-12 p-md-2 text-lable-required text-md-right">
<label>類別:</label>
</div>
<div class="p-col-12 p-md-4">
<div class="p-inputgroup">
<input type="text" pInputText [value]="selectedItem.type" placeholder="請選擇產品類別" [readonly]="true"
pTooltip="唯讀欄位" tooltipPosition="top">
<button pButton type="button" icon="fal fa-list" class="p-button-warning"
(click)="viewProductType()"></button>
</div>
</div>
<div class="p-col-12 p-md-2 text-lable-read text-md-right">
<label>單位:</label>
</div>
<div class="p-col-12 p-md-4">
<div class="p-inputgroup">
<input pInputText [value]="selectedItem.unit " [readonly]="true" pTooltip="唯讀欄位,綁定產品類別" tooltipPosition="top">
</div>
</div>
<div class="p-col-12 p-md-2 text-lable-required text-md-right">
<label>狀態:</label>
</div>
<div class="p-col-12 p-md-4">
<p-dropdown [options]="stateTypes" [(ngModel)]="selectedItem.stateType" optionLabel="name" optionValue="value"
placeholder="請選擇產品狀態" [style]="{'width': '100%'}">
</p-dropdown>
</div>
<div class="p-col-12 p-md-2 text-lable text-md-right">
<label>型號:</label>
</div>
<div class="p-col-12 p-md-4">
<div class="p-inputgroup">
<input pInputText [(ngModel)]="selectedItem.model">
</div>
</div>
<div class="p-col-12 p-md-2 text-lable text-md-right">
<label>規格:</label>
</div>
<div class="p-col-12 p-md-10">
<textarea pInputTextarea [rows]="10" [cols]="100" [(ngModel)]="selectedItem.specification"></textarea>
</div>
<div class="p-col-12 p-md-2 text-lable text-md-right">
<label>備註:</label>
</div>
<div class="p-col-12 p-md-10">
<textarea pInputTextarea [rows]="3" [cols]="100" [(ngModel)]="selectedItem.notes"></textarea>
</div>
<div class="p-col-12 p-md-2 text-lable text-md-right">
<label>產品照片:</label>
</div>
<div class="p-col-12 p-md-10">
<img [src]="'api/images/'+selectedItem.imageUid+'?w=200&h=200'" [alt]="selectedItem.name" />
</div>
<div class="p-col-12 p-grid">
<div class="p-col-12 p-md-3 p-inputgroup">
<span class="p-inputgroup-addon"><i class="fal fa-user-edit"></i></span>
<input type="text" pInputText [value]="selectedItem.createdBy" [readonly]="true" pTooltip="更新人員"
tooltipPosition="top">
</div>
<div class="p-col-12 p-md-3 p-inputgroup">
<span class="p-inputgroup-addon"><i class="fal fa-clock"></i></span>
<input type="text" pInputText [value]="selectedItem.createdDate" [readonly]="true" pTooltip="更新時間"
tooltipPosition="top">
</div>
<div class="p-col-12 p-md-6" dir="rtl">
<button *ngIf="!config.read" type="button" pButton icon="fal fa-check" label="儲存" class="p-button-success"
style="width: 120px;margin-left: 12px;" (click)="save()"></button>
<button *ngIf="!config.read && !config.isNew" type="button" pButton icon="fal fa-file-times" label="停產" class="p-button-danger"
style="width: 120px;margin-left: 12px;" (click)="save(-1,'停產')"></button>
</div>
</div>
</div>
</div>
</div>
</div>
|
這邊移除了照片上傳功能,僅保留主要的邏輯處理,這樣比較容易理解,整體操作介面會如下圖:
後記
在介面上我們透過 Template-Driven Forms 方式處理資料與表單的互動,當然也可採用 Reactive Forms(Model-Driven Forms)。
如果你也有看過筆者後端的開發說明,那你可以嘗試思考當資料庫增加一個表單時,我們要如何建立一個維護功能?
後端:
- 利用
dotnet ef dbcontext scaffold 更新 Model 模型。
- 複製 Model 來建立 ViewModel 模型。
- 複製既有 ViewModel 的擴充方法來修改。
- 建立 Controller 讓它繼承自 DataController 並複寫相關方法。
筆者會複製既有的 Controller 來修改更快。
前端:
- 複製後端的 ViewModel 來產生對應的 Model。
- 在 Service 內建立 REST 對應的方法與 DetailMode 的預設實作方法。
這邊也可以複製既有的方法來修改比較快。
- 建立清單與維護的 Component。
複製既有 Component 的程式與範本來修改。
- 增加路由規則。
我們可以發現主要差異就是類別名稱與屬性,所以不用 Copy Paste 好像有點說不過去,唯一最大的變數就是後端 Controller 的邏輯處理,如果是 Master–detail 的資料,例如報價單會有多個品項,我們的資料處理與判斷邏輯可能會比較複雜,不然建立一個維護功能需要的時間其實…。
撇開正規的教育,如果要一個新手能夠有即戰力,其實我們要教的東西不多。
想想,如果連 Web 的基本概念都不懂的人都可以開發網站…這真的會嚴重破壞軟體品質,不過對於有人力、時程壓力的中小專案來說,至少是一個可行辦法。